Image 图片
基本用法
Image 图片组件可以显示实体属性为 FileRef 或 byte[] 类型的数据。
@JmixEntity
@Table(name = "UIEX1_PERSON")
@Entity(name = "uiex1_Person")
public class Person {

    /* other attributes */

    @Column(name = "IMAGE", length = 1024)
    private FileRef image;
最简单的方法是通过 dataContainer 和 property 属性声明式地关联图片:
<data readOnly="true">
    <instance id="personDc"
              class="ui.ex1.entity.Person">
        <fetchPlan extends="_base"/>
        <loader/>
    </instance>
</data>
<layout spacing="true">
    <image id="fileRefImage"
           dataContainer="personDc"
           property="image"/>
</layout>
上面例子中,该组件展示 personDc 数据容器中 Person 实体的 image 属性。
图片源
Image 图片组件还可以展示其他源的图片。通过下列内部的 XML 元素设置不同的源类型,或者通过 setSource() 方法编程式设置。
|
如需在 Jmix Studio 中定义 |
ClasspathResource
classpath 中的资源。
-
XML 中,使用
classpath元素以及path属性。例如,如果图片位于
src/main/resources下面的"ui/ex1/screen/component/image/jmix-logo.png",可以这样设置资源:<image scaleMode="SCALE_DOWN" width="20%" height="20%"> <resource> <classpath path="ui/ex1/screen/component/image/jmix-logo.png"/> </resource> </image> -
Java 中,使用
ClasspathResource接口。image.setSource(ClasspathResource.class) .setPath("ui/ex1/screen/component/image/jmix-logo.png");
FileResource
服务器文件系统中的资源。
-
XML 中,使用
file元素以及path属性。<image scaleMode="SCALE_DOWN" width="20%" height="20%"> <resource> <file path="D:\JMIX\jmix-logo.png"/> </resource> </image> -
Java 中,使用
FileResource接口。image.setSource(FileResource.class) .setFile(file);
FileStorageResource
保存在 文件存储 中的图片
-
XML 中,使用
image元素以及property属性。<image id="fileRefImage" dataContainer="personDc" property="image"/> -
Java 中,使用
FileStorageResource接口。image.setSource(FileStorageResource.class) .setFileReference(person.getImage());
RelativePathResource
应用程序提供的静态图片。
默认情况下,静态内容存放在 /static、/public、/resources 目录或 classpath 中的 /META-INF/resources 目录(详情参阅 Spring Boot 文档)。
-
XML 中,使用
relativePath元素以及path属性。例如,位于
src/main/resources/static/images/jmix-icon-login.svg的图片可以这样展示:<image> <resource> <relativePath path="images/jmix-icon-login.svg"/> </resource> </image>图片也可以通过
http://{host}:{port}/images/jmix-icon-login.svg访问。 -
Java 中,使用
RelativePathResource接口。image.setSource(RelativePathResource.class) .setPath("images/jmix-icon-login.svg");
StreamResource
由 InputStream 提供的图片。
-
Java 中,使用
StreamResource接口。byte[] picture; // picture = ... image.setSource(StreamResource.class) .setStreamSupplier(() -> new ByteArrayInputStream(picture));
ThemeResource
当前 主题 中的图片。
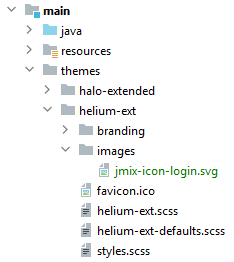
下面示例中,图片位于 helium-ext 自定义主题的 images 文件夹:

然后可以在 Image 组件这样使用:
-
XML 中,使用
theme元素以及path属性。<image> <resource> <theme path="images/jmix-icon-login.svg"/> </resource> </image> -
Java 中,使用
ThemeResource接口。image.setSource(ThemeResource.class) .setPath("images/jmix-icon-login.svg");
UrlResource
由任意 URL 提供的图片。
-
XML 中,使用
url元素以及url属性。<image scaleMode="SCALE_DOWN" width="20%" height="20%"> <resource> <url url="https://www.jmix.io/uploads/framework_image_9efadbc372.svg"/> </resource> </image> -
Java 中,使用
UrlResource接口。try { image.setSource(UrlResource.class) .setUrl(new URL("https://www.jmix.io/images/jmix-logo.svg")); } catch (MalformedURLException e) { log.error("Invalid URL format", e); }
属性
-
alternateText- 设置替换文本,当资源未设置或不可用时显示该文本。
-
scaleMode- 图片的缩放模式,对应 CSS 中的object-fit属性,有以下几种模式可选:-
FILL- 根据组件大小拉伸图片。 -
CONTAIN- 保留长宽比压缩图片到能刚好在组件中全部展示。 -
COVER- 图片会被压缩或者拉升以适应组件的整个区域,维持组件本身的比例。如果图片的比例和组件的比例不匹配,会将图片做裁剪以适配组件的比例。 -
SCALE_DOWN- 在NONE和CONTAIN中选择图片能全部展示并且尺寸最小的方式。 -
NONE- 图片保持原本大小。
-
方法
如需以编程的方式管理 Image 组件,可以使用下列方法:
-
setValueSource()- 设置数据容器和实体属性名称,只支持FileRef和byte[]两种类型的属性。数据容器可以通过编程的方式设置,比如在单元格中显示图片:
<data readOnly="true">
    <collection id="personsDc"
                class="ui.ex1.entity.Person">
        <fetchPlan extends="_base"/>
        <loader id="personsDl">
            <query>
                <![CDATA[select e from uiex1_Person e]]>
            </query>
        </loader>
    </collection>
</data>
<layout spacing="true">
    <groupTable id="personsTable"
                width="100%"
                dataContainer="personsDc">
        <columns>
            <column id="name"/>
        </columns>
    </groupTable>
</layout>
@Autowired private GroupTable<Person> personsTable; @Autowired private UiComponents uiComponents; @Subscribe public void onInit(InitEvent event) { personsTable.addGeneratedColumn("image", entity -> { Image<FileRef> image = uiComponents.create(Image.NAME); image.setValueSource( new ContainerValueSource<>( personsTable.getInstanceContainer(entity), "image")); image.setHeight("100px"); image.setScaleMode(Image.ScaleMode.CONTAIN); return image; }); } -
setSource()- 设置图片 内容源。输入源类型,返回源对象,并继续通过流式接口配置源内容。<layout spacing="true"> <image id="programmaticImage"/> </layout>@Autowired private Image<FileRef> programmaticImage; @Subscribe public void onInit(InitEvent event) { try { URL url = new URL("https://www.jmix.io/images/jmix-logo.svg"); programmaticImage.setSource(UrlResource.class).setUrl(url); } catch (MalformedURLException e) { log.error("Error", e); } }
事件和处理器
|
如需使用 Jmix Studio 生成处理器的桩代码,需要在界面 XML 描述或者 Jmix UI 层级结构面板选中该组件,然后用 Jmix UI 组件面板的 Handlers 标签页生成。 或者可以使用界面控制器顶部面板的 Generate Handler 按钮。 |
ClickEvent
参阅 ClickEvent。
SourceChangeEvent
SourceChangeEvent 当图片的资源变化时发送。SourceChangeEvent 有下列方法:
-
getNewSource() -
getOldSource()
@Subscribe("image")
public void onImageSourceChange(ResourceView.SourceChangeEvent event) {
    notifications.create()
            .withCaption("Old source was: " + event.getOldSource() +
                    "; new source is: " + event.getNewSource());
}
如需以编程的方式注册事件处理器,使用组件的 addSourceChangeListener() 方法。
XML 属性
|
可以使用 Studio 界面设计器的 Jmix UI 组件面板查看和编辑组件的属性。 |
Image XML 属性
align - alternateText - box.expandRatio - caption - captionAsHtml - colspan - contextHelpText - contextHelpTextHtmlEnabled - css - dataContainer - description - descriptionAsHtml - editable - enable - height - htmlSanitizerEnabled - icon - id - property - required - requiredMessage - property - required - requiredMessage - rowspan - scaleMode - stylename - visible - width
Resources XML 元素
classpath - file - relativePath - theme - url
