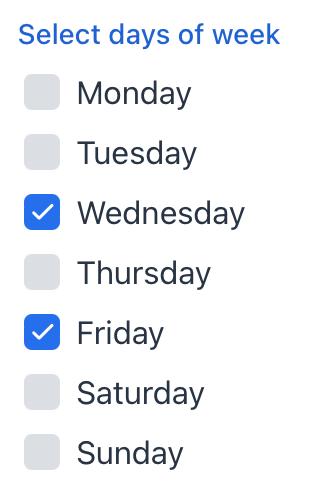
checkboxGroup 复选框组
checkBoxGroup 支持用户使用一组复选框选择多个值。
XML 元素 |
|
|---|---|
Java 类 |
|
XML 属性 |
id - alignSelf - ariaLabel - ariaLabelledBy - classNames - colspan - css - dataContainer - enabled - errorMessage - height - helperText - itemsContainer - itemsEnum - label - maxHeight - maxWidth - minHeight - minWidth - property - readOnly - required - requiredMessage - themeNames - visible - width |
事件和处理器 |
AttachEvent - ClientValidatedEvent - ComponentValueChangeEvent - DetachEvent - TypedValueChangeEvent - itemEnabledProvider - itemLabelGenerator - renderer - statusChangeHandler - validator |
XML 内部元素 |
基本用法
checkBoxGroup 最简单的用法是用于选择枚举值。
<checkboxGroup itemsEnum="com.company.onboarding.entity.OnboardingStatus"
               label="Select the onboarding status"/>
数据绑定
该组件支持绑定至 data container 中的实体属性。
如需将 checkBoxGroup 绑定至实体属性:
-
使用 dataContainer 属性指定数据容器的名称。
-
使用 property 属性指定实体属性的名称。
<data>
    <instance class="com.company.onboarding.entity.User" id="userDc">
        <fetchPlan extends="_base">
            <property name="hobbies" fetchPlan="_base"/>
        </fetchPlan>
        <loader id="userDl"/>
    </instance>
    <collection class="com.company.onboarding.entity.Hobby" id="hobbiesDc">
        <fetchPlan extends="_base"/>
        <loader id="hobbiesDl">
            <query>
                <![CDATA[select e from Hobby e]]>
            </query>
        </loader>
    </collection>
</data>
<layout>
    <checkboxGroup dataContainer="userDc"
                   property="hobbies"
                   itemsContainer="hobbiesDc"
                   id="checkboxGroup"/>
</layout>示例中,checkBoxGroup 会展示 Hobby 实体的实例名,getTypedValue() 方法返回选择实例的 Collection.
自定义选项
使用下列方法可以为 checkBoxGroup 设置选项:
选项列表
setItems() 方法可以编程式设置组件的选项。
@ViewComponent
private JmixCheckboxGroup<Integer> checkboxGroupInt;

@Subscribe
public void onInit(final InitEvent event) {
    checkboxGroupInt.setItems(1, 2, 3, 4, 5);
}
选项映射
ComponentUtils.setItemsMap() 支持分别设置每个选项的显示名称和值。
@ViewComponent
private JmixCheckboxGroup<Integer> ratingCheckboxGroup;

@Subscribe
public void onInit(final InitEvent event) {
    Map<Integer, String> map = new LinkedHashMap<>();
    map.put(2, "Poor");
    map.put(3, "Average");
    map.put(4, "Good");
    map.put(5, "Excellent");
    ComponentUtils.setItemsMap(ratingCheckboxGroup, map);
}
选项枚举
checkBoxGroup 的选项值还可以通过声明式或编程的方式设置为枚举。
下面的示例演示了声明式用法。
<checkboxGroup itemsEnum="com.company.onboarding.entity.OnboardingStatus"
               label="Select the onboarding status"/>
下面的示例使用了编程式用法。
@ViewComponent
private JmixCheckboxGroup<OnboardingStatus> checkboxGroupEnum;

@Subscribe
public void onInit(final InitEvent event) {
    checkboxGroupEnum.setItems(OnboardingStatus.class);
}
方向
选项默认是水平排列的。如需修改为竖直排列,可以通过配置 themeNames 实现:
<checkboxGroup itemsEnum="com.company.onboarding.entity.DayOfWeek"
               label="Select days of week"
               themeNames="vertical"/>
样式版本
如需自定义 选项的布局 以及帮助文字的显示的位置,可以使用 themeNames 属性。
例如,helper-above-field 会将帮助文字显示在控件上方而不是默认的下方:
<checkboxGroup itemsEnum="com.company.onboarding.entity.OnboardingStatus"
               label="Select the onboarding status"
               helperText="Helper text"
               themeNames="helper-above-field"/>
自定义选项展示
可以通过 setRenderer() 方法或 @Supply 注解自定义选项的渲染效果。
@Autowired
private UiComponents uiComponents;
@Autowired
private FileStorage fileStorage;

@Supply(to = "userCheckboxGroup", subject = "renderer")
private ComponentRenderer<HorizontalLayout, User> userCheckboxGroupRenderer() {
    return new ComponentRenderer<>(user -> {
        FileRef fileRef = user.getPicture();
        HorizontalLayout row = uiComponents.create(HorizontalLayout.class);
        row.setAlignItems(FlexComponent.Alignment.END);
        if (fileRef != null) {
            Image image = uiComponents.create(Image.class);
            image.setWidth("30px");
            image.setHeight("30px");
            image.setClassName("user-picture");
            StreamResource streamResource = new StreamResource(
                    fileRef.getFileName(),
                    () -> fileStorage.openStream(fileRef));
            image.setSrc(streamResource);
            row.add(image);
        }
        row.add(new Span(user.getFirstName() + ", " + user.getLastName()));
        return row;
    });
}
或者,可以使用内部的 fragmentRenderer 元素来渲染条目。有关详细信息,请参阅 Fragment 渲染器 部分。
