第一部分:入门
本节中,我们将创建:
-
WebdavDocumentWrapper实体,带有WebdavDocument类型的属性。 -
CRUD 视图,包括上传 WebDAV 文档的 UI 组件。
可能需要做一些额外配置以便能通过桌面应用程序(Wor,Excel 或 LibreOffice 等)打开或编辑上传的 WebDAV 文件。
创建 WebdavDocumentWrapper 实体
首先,我们需要创建 WebdavDocumentWrapper 实体。
| 入门教程中 2. 简单的增删改查 部分有关于如何创建实体的详细说明。 |
在 Jmix 工具窗口中,点击 New( )→ JPA Entity。在 Class 字段输入
 WebdavDocumentWrapper。
WebdavDocumentWrapper 实体具有下列属性:
-
description-String类型。 -
lastModifiedBy-String类型。 -
lastModifiedDate-OffsetDateTime类型。 -
webdavDocument-WebdavDocument类型: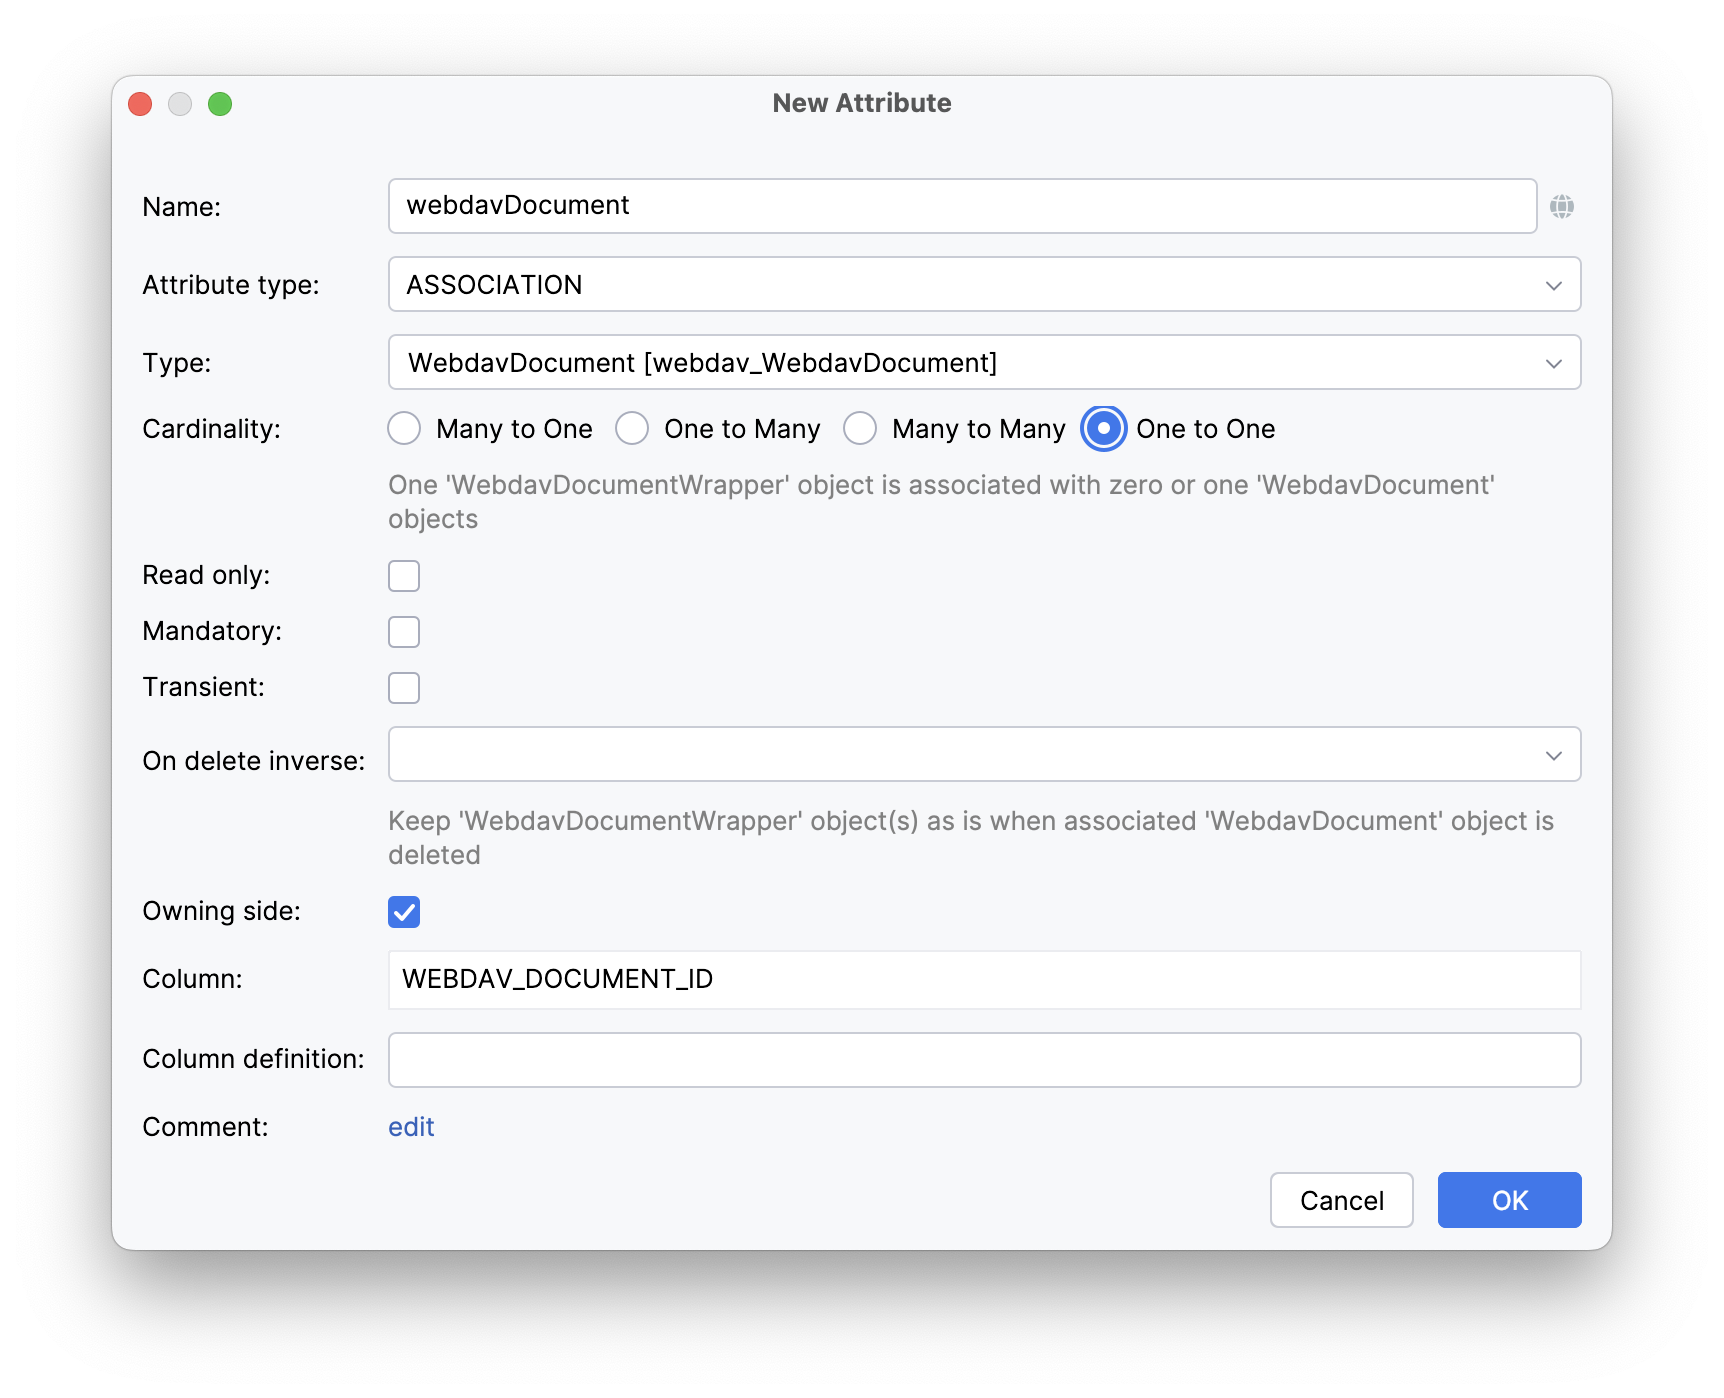
创建 CRUD 视图
下面我们为 WebdavDocumentWrapper 实体创建 CRUD 视图。
点击实体编辑器顶部操作面板内的 Views → Create view。
在视图向导的第一步,选择 Entity list and detail views 模板,点击 Next。
向导的后面两步中,我们都使用提供的默认建议。
在 Entity list view fetch plan 步骤中,添加 webdavDocument 属性:
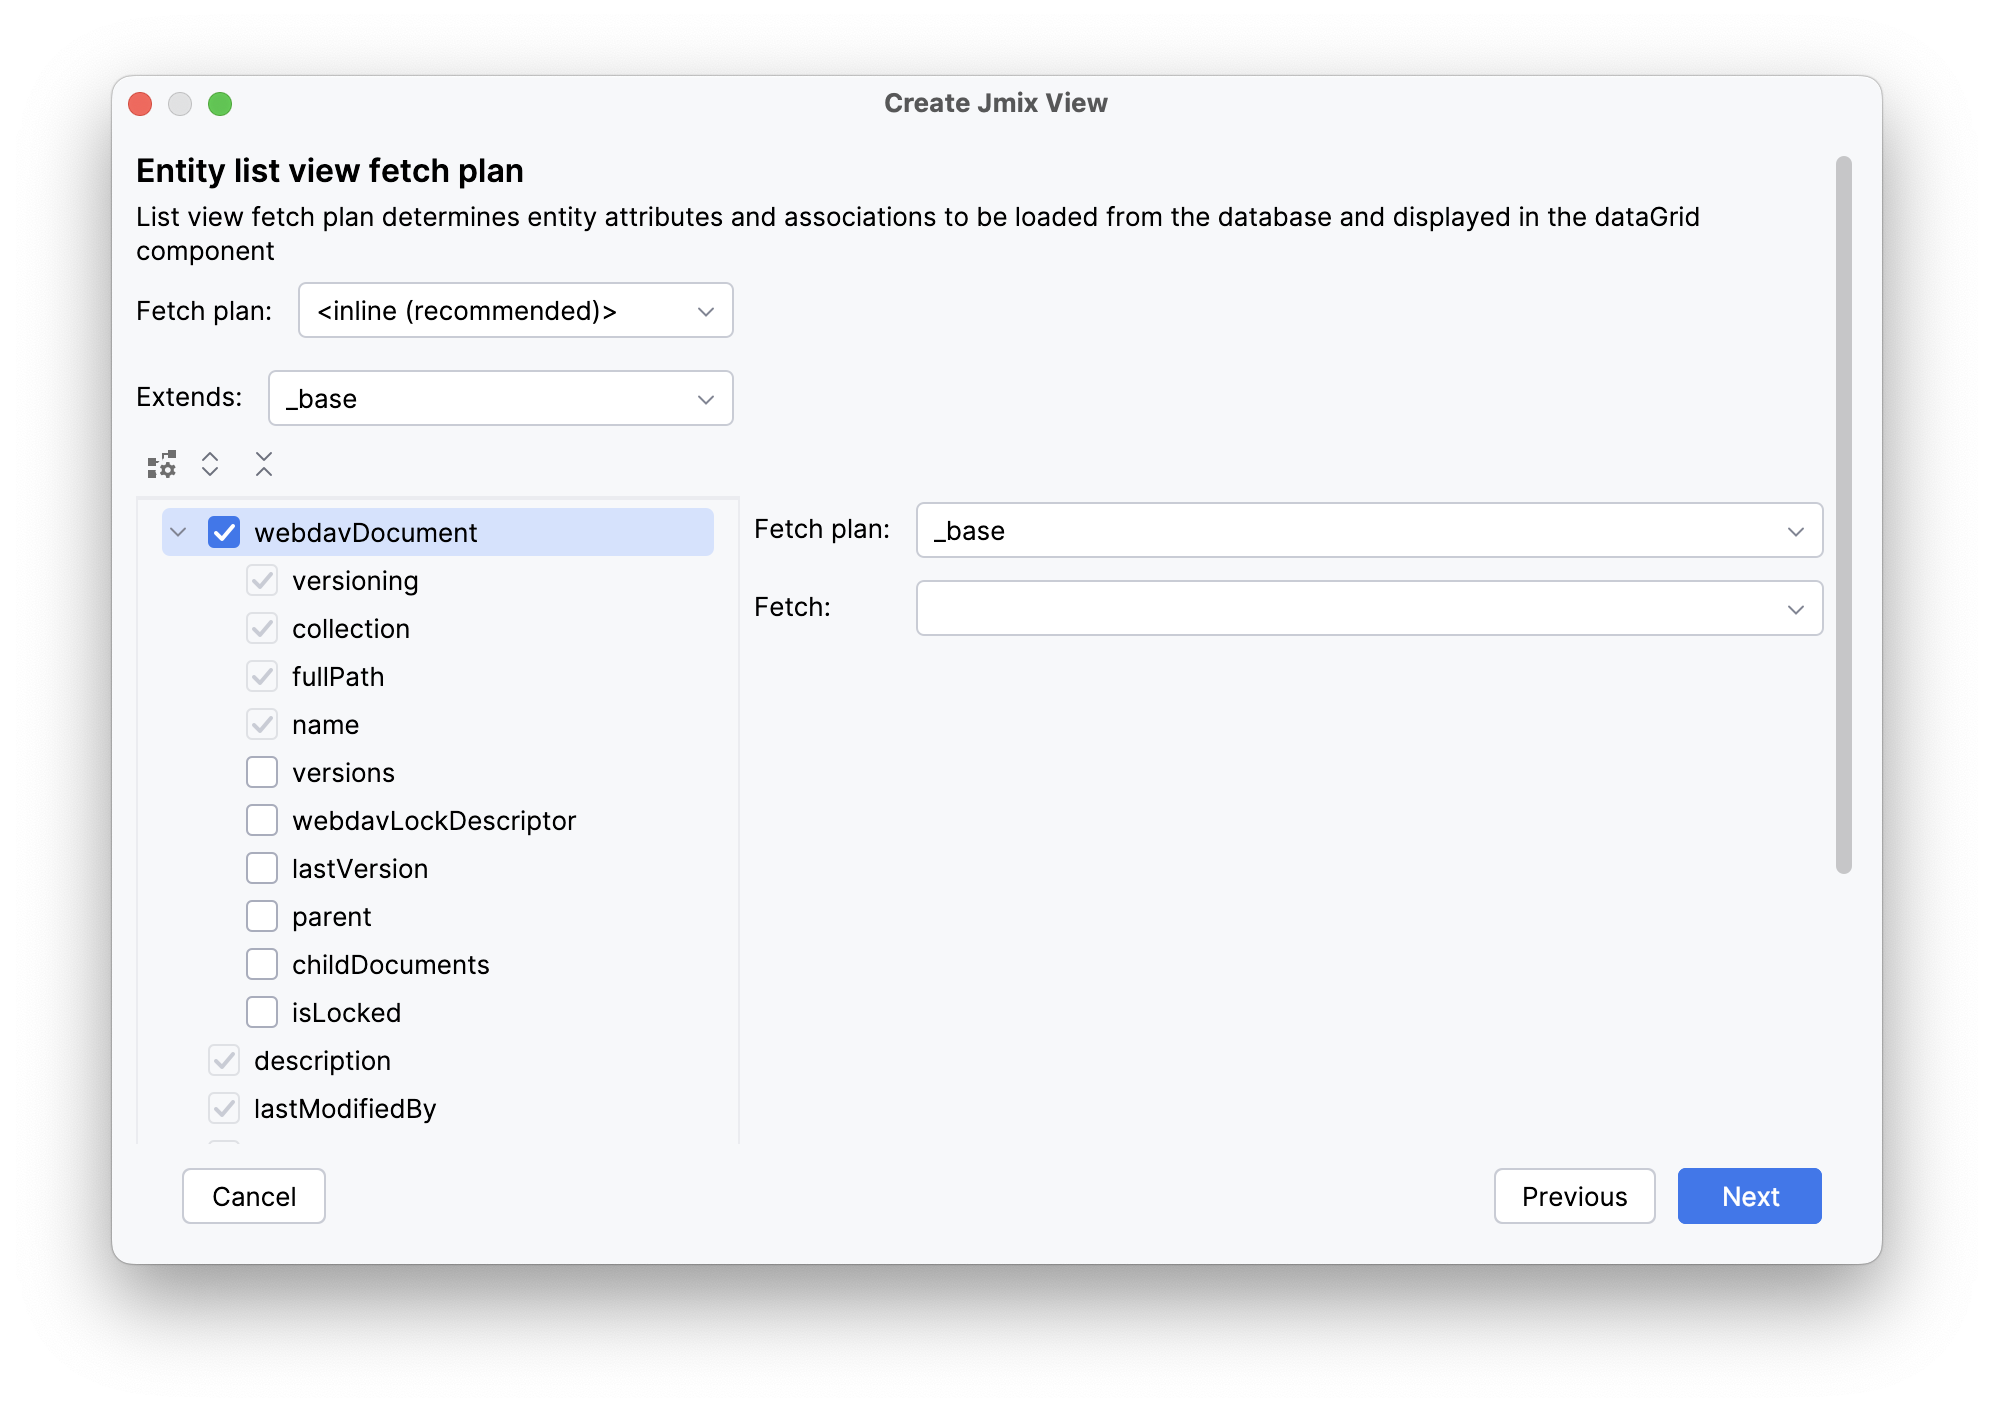
现在,可以确定子实体 WebdavDocument 将与父实体 WebdavDocumentWrapper 一起加载并显示在列表视图中。
| 如果 fetch plan 中不存在某个属性,Studio 不会在生成的视图中为其创建可视化组件。 |
点击 Next。
在 Entity detail view fetch plan 步骤中,删除对 lastModifiedBy 和 lastModifiedDate 属性的选择。这些属性会自动赋值,所以没必要显示在详情视图。
点击 Next。
Studio 会自动生成两个视图:WebdavDocumentWrapper.list 和 WebdavDocumentWrapper.detail,并打开源码编辑器。
添加 WebdavDocumentUploadField
在 Jmix 工具窗口中找到 webdav-document-wrapper-detail-view.xml 并双击打开:
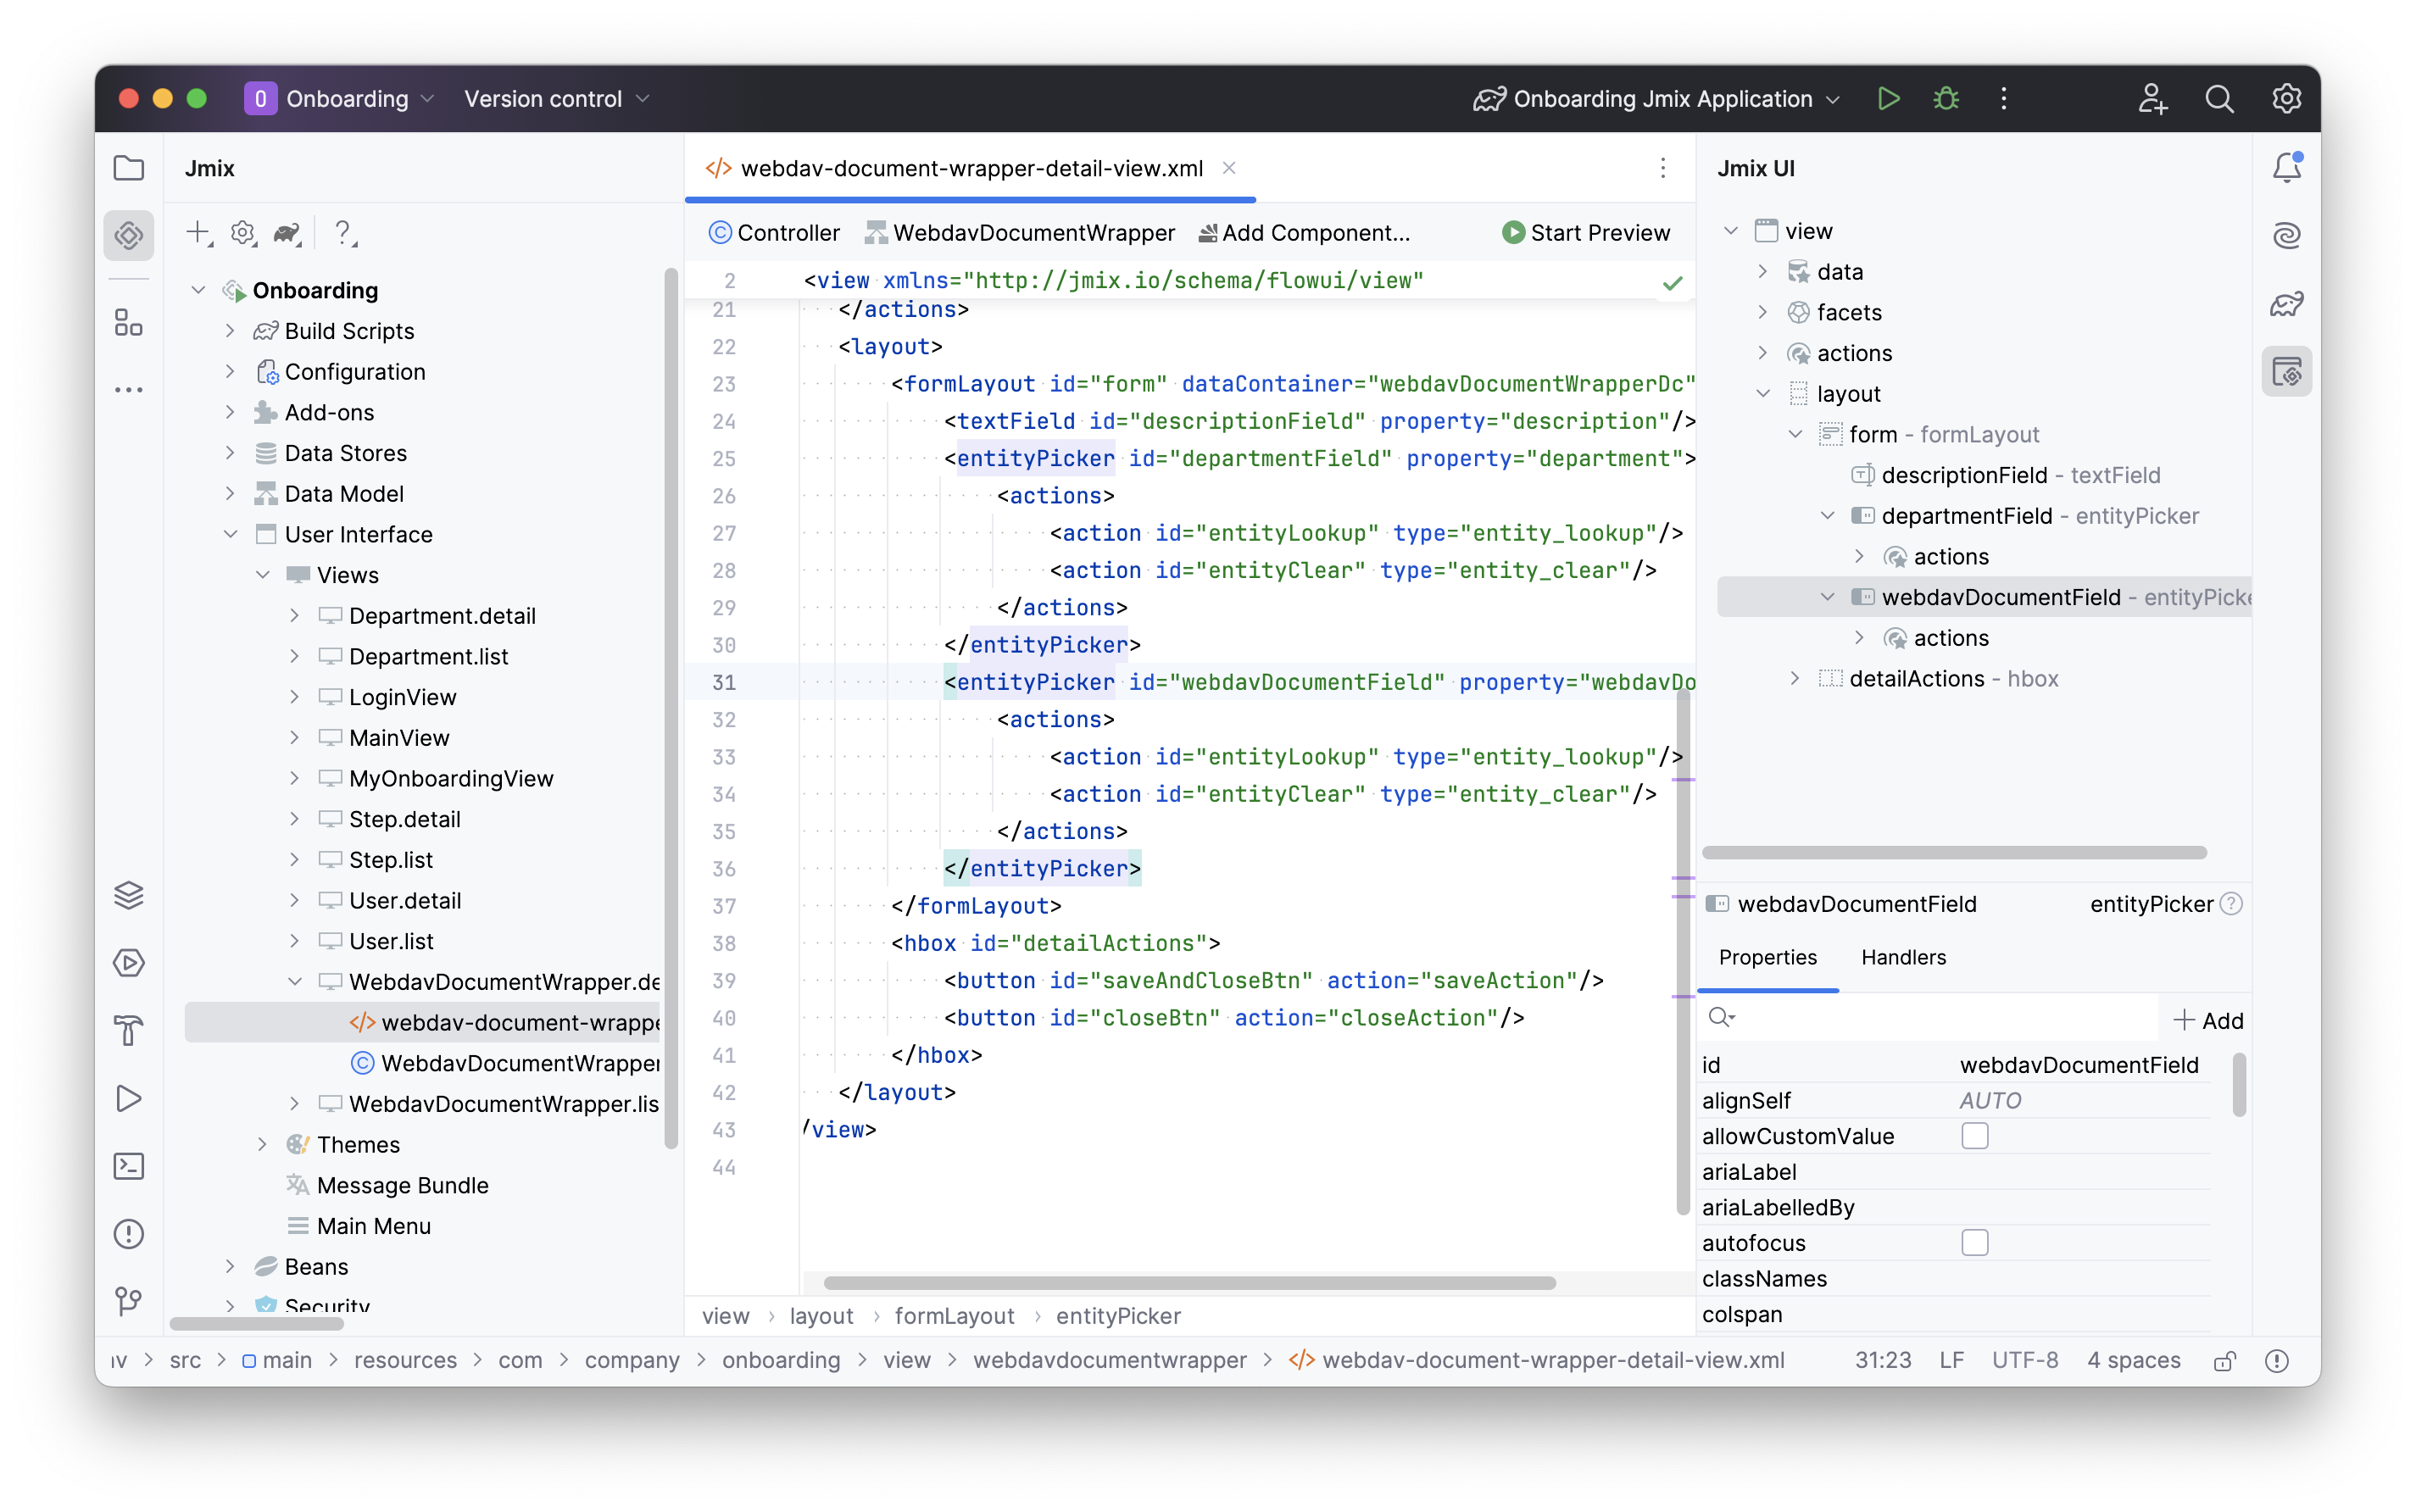
可以看到目前使用的是 entityPicker 组件来展示 webdavDocument 属性。
如果需要显示能处理文档的特定组件,需要在 XML 中使用 webdavDocumentUploadField UI 组件。
从 XML 中删除 entityPicker,并将光标放置于 textField 组件之后。点击操作面板中的 Add Component,找到 WebdavDocumentUploadField 并双击添加。
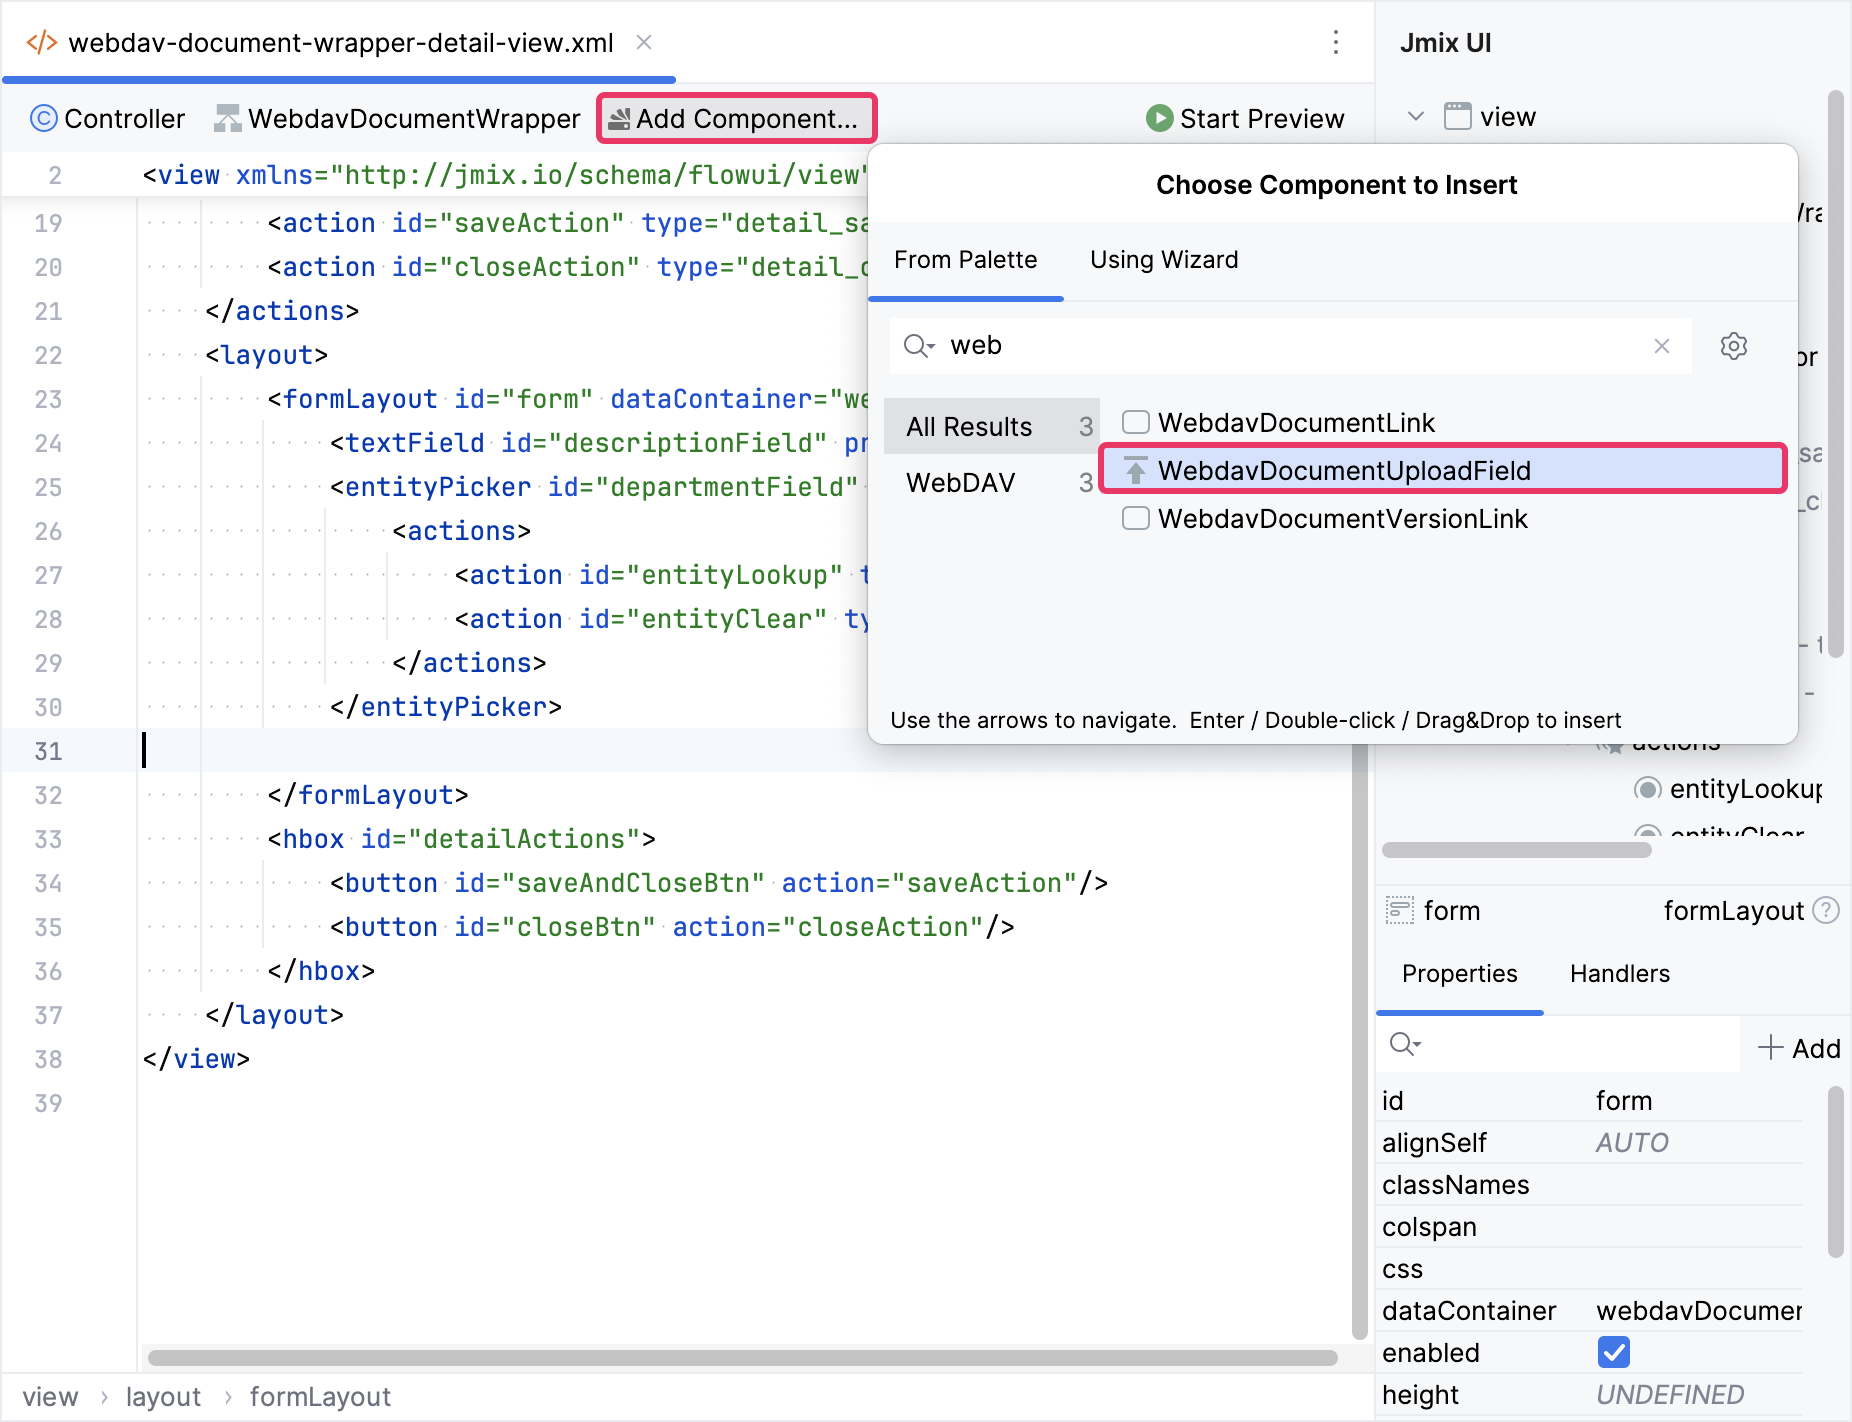
新的 webdavDocumentUpload 元素将添加到 Jmix UI 结构面板和 XML 中的 formLayout 元素内。按下面的代码配置配置 id、colspan 和 property 属性:
<textField id="descriptionField"
           property="description"
           colspan="2"/>
<webdav:webdavDocumentUpload id="webdavDocumentField"
                             property="webdavDocument"
                             colspan="2"/>
运行应用程序
实体和 CRUD 视图创建完成后,可以运行应用程序查看目前的改动。
点击主工具栏的 Debug( )按钮。
)按钮。
在应用程序运行之前,Studio 会先比较项目中的数据模型和数据库中的表结构。当新创建了实体时,Studio 会自动生成 Liquibase changelog 用于更新数据库(例如,创建 WEBDAV_DOCUMENT_WRAPPER 表):
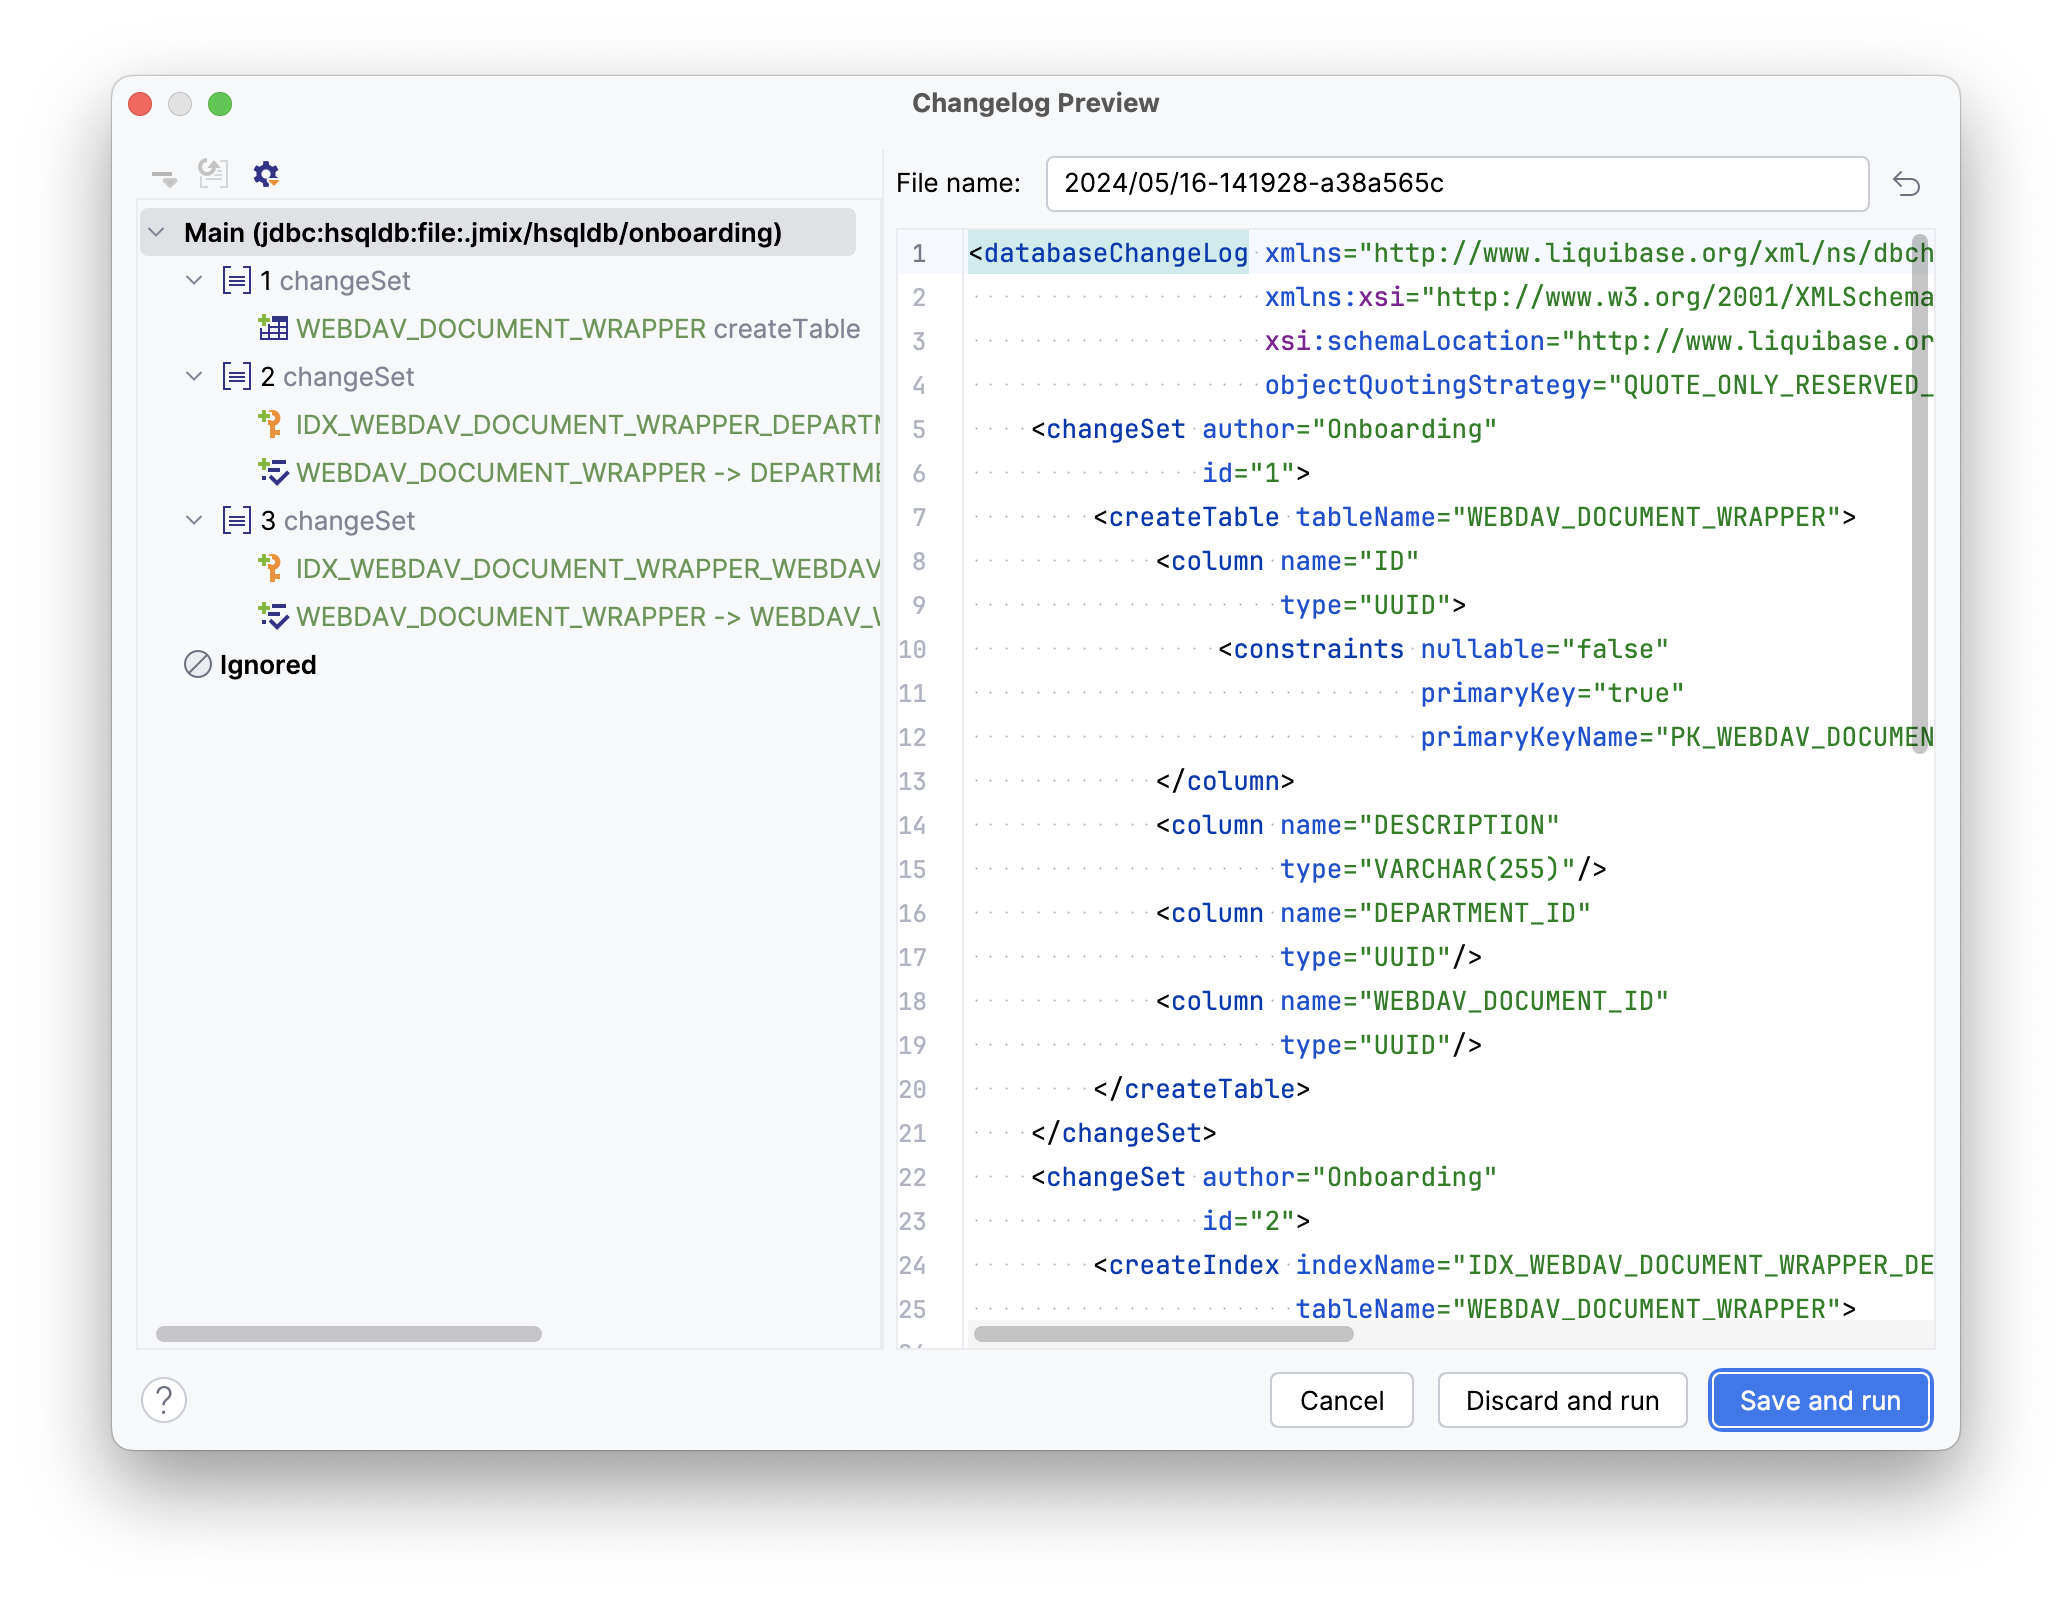
点击 Save and run。
Studio 将在数据库中执行 changelog,然后构建并运行应用程序:
应用程序启动并运行后,使用浏览器打开 http://localhost:8080 地址,然后使用 admin/admin 登录。
从 Application 菜单中选择 Webdav document wrappers 打开 WebdavDocumentWrapper.list 视图。点击 Create 打开 WebdavDocumentWrapper.detail 视图。除了描述文件的文本字段外,可以看到一个用于文件上传的 WebDAV 组件。尝试使用该组件上传文件:
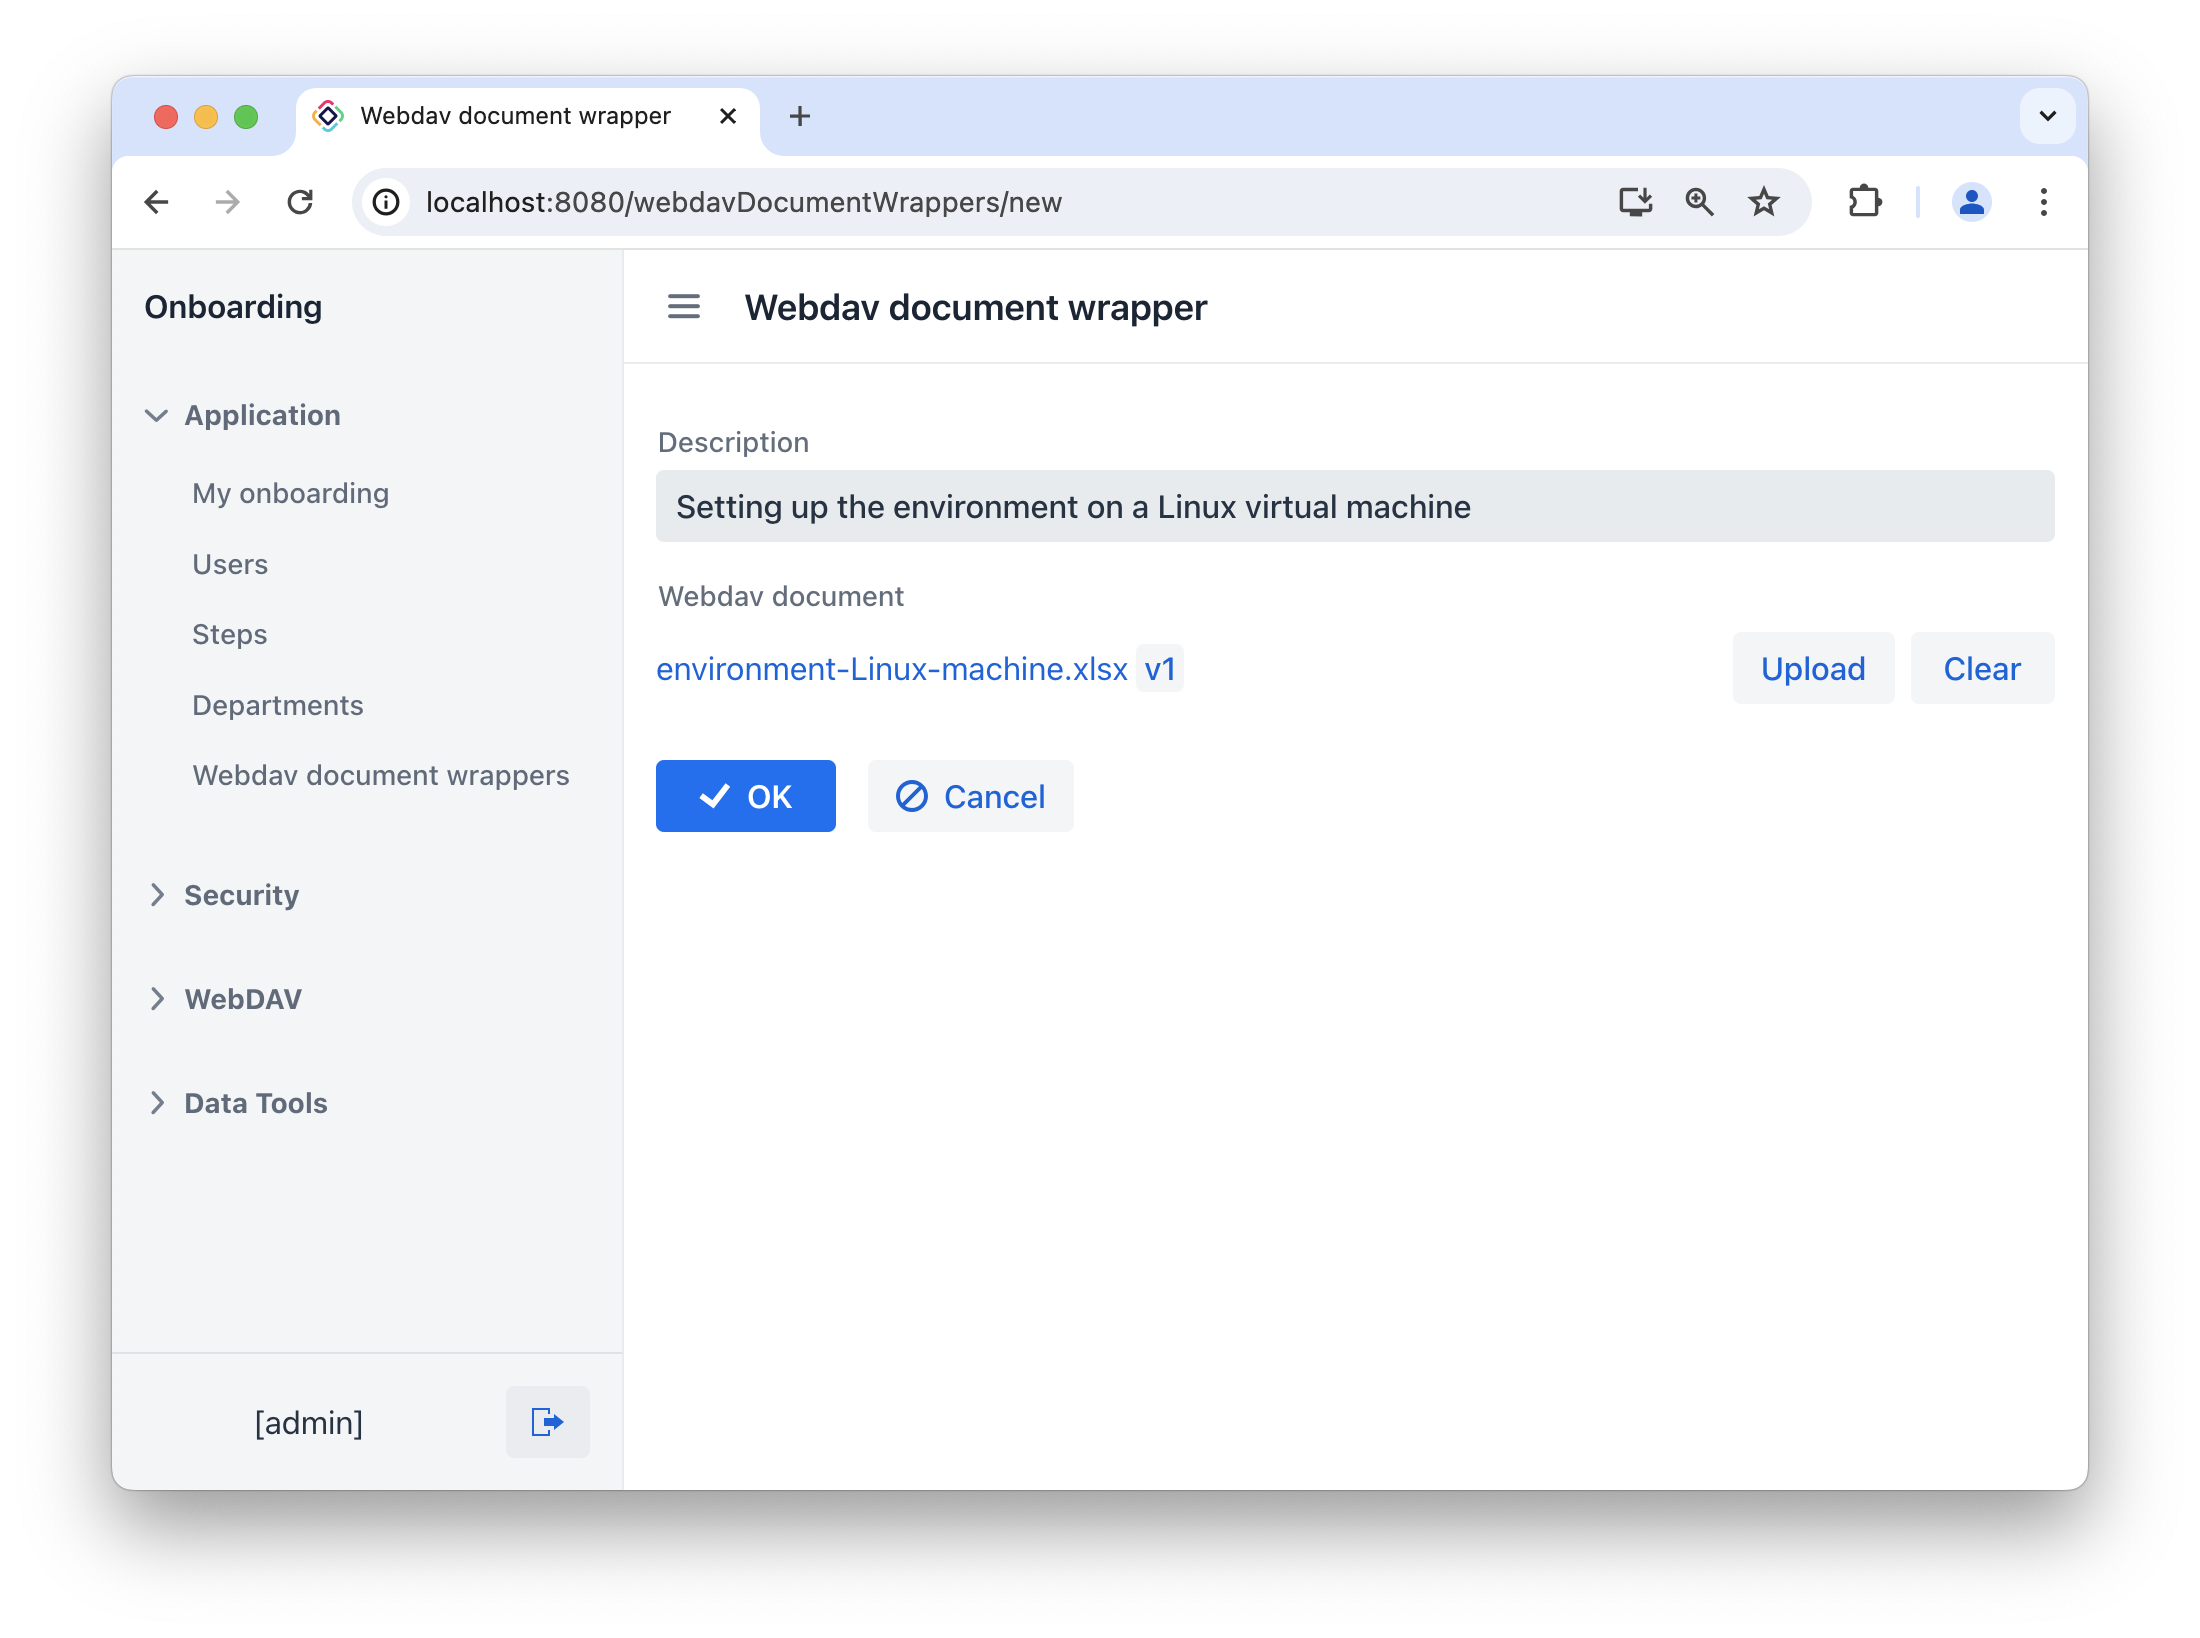
点击 OK 按钮后,网页将重定向到列表视图。此时,Webdav document 列显示文件标识符。在下一节中,我们将展示如何在数据网格中显示文档的链接,而非其标识符。
自定义 UI
下面我们对应用程序的 UI 做一些修改。
改进列表视图
-
我们在列表视图的数据网格中显示文档链接而非标识符。
打开
webdav-document-wrapper-list-view.xml并找到webdavDocumentWrappersDataGrid。选择
webdavDocument列,在组件属性面板中切换至 Handlers tab,并创建一个renderer处理方法:@Supply(to = "webdavDocumentWrappersDataGrid.webdavDocument", subject = "renderer") private Renderer<WebdavDocumentWrapper> webdavDocumentWrappersDataGridWebdavDocumentRenderer() { return null; }注入
UiComponents对象:@Autowired private UiComponents uiComponents;可以使用编辑器顶部操作面板中的 Inject 按钮将依赖项注入视图控制器和 Spring Bean 中。 实现
webdavDocumentWrappersDataGridWebdavDocumentRenderer方法:@Supply(to = "webdavDocumentWrappersDataGrid.webdavDocument", subject = "renderer") private Renderer<WebdavDocumentWrapper> webdavDocumentWrappersDataGridWebdavDocumentRenderer() { return new ComponentRenderer<>( (1) () -> uiComponents.create(WebdavDocumentLink.class), (2) (link, wrapper) -> { WebdavDocument webdavDocument = wrapper.getWebdavDocument(); if (webdavDocument != null) { link.setWebdavDocument(webdavDocument); } }); }1 方法返回一个 Renderer对象,创建一个在列中渲染的 UI 组件。2 使用 UiComponents工厂创建 WebdavDocumentLink 组件实例。 -
对
lastModifiedBy列,我们配置让其显示最后修改 WebDAV 文件的人。选择
lastModifiedBy列,在组件属性面板中切换至 Handlers tab,并创建一个renderer处理方法:@Supply(to = "webdavDocumentWrappersDataGrid.lastModifiedBy", subject = "renderer") private Renderer<WebdavDocumentWrapper> webdavDocumentWrappersDataGridLastModifiedByRenderer() { return null; }实现
webdavDocumentWrappersDataGridLastModifiedByRenderer方法:@Supply(to = "webdavDocumentWrappersDataGrid.lastModifiedBy", subject = "renderer") private Renderer<WebdavDocumentWrapper> webdavDocumentWrappersDataGridLastModifiedByRenderer() { return new TextRenderer<>(documentWrapper -> { (1) WebdavDocument webdavDocument = documentWrapper.getWebdavDocument(); if (webdavDocument == null) { return null; } WebdavDocumentVersion lastVersion = webdavDocument.getLastVersion(); return lastVersion.getCreatedBy(); (2) }); }1 方法返回一个 TextRenderer对象。2 返回对最新版本的 WebDAV 文档进行更改的用户的名称。 -
对
lastModifiedDate列,我们配置让其显示 WebDAV 文件的最后修改时间。选择
lastModifiedDate列,在组件属性面板中切换至 Handlers tab,并创建一个renderer处理方法:@Autowired private ApplicationContext applicationContext; @Supply(to = "webdavDocumentWrappersDataGrid.lastModifiedDate", subject = "renderer") private Renderer<WebdavDocumentWrapper> webdavDocumentWrappersDataGridLastModifiedDateRenderer() { DateFormatter dateFormatter = applicationContext.getBean(DateFormatter.class); return new TextRenderer<>(documentWrapper -> { WebdavDocument webdavDocument = documentWrapper.getWebdavDocument(); if (webdavDocument == null) { return null; } WebdavDocumentVersion lastVersion = webdavDocument.getLastVersion(); Date lastModifiedDate = lastVersion.getCreatedDate(); dateFormatter.setFormat("MMM dd, yyyy"); return dateFormatter.apply(lastModifiedDate); }); }
改进详情视图
这里我们修改 WebdavDocumentWrapper 的详情视图以对话框的模式打开。
打开 webdav-document-wrapper-list-view.xml 并找到 webdavDocumentWrappersDataGrid。选择 create 操作,并在操作的属性面板中设置 openMode 为 DIALOG。
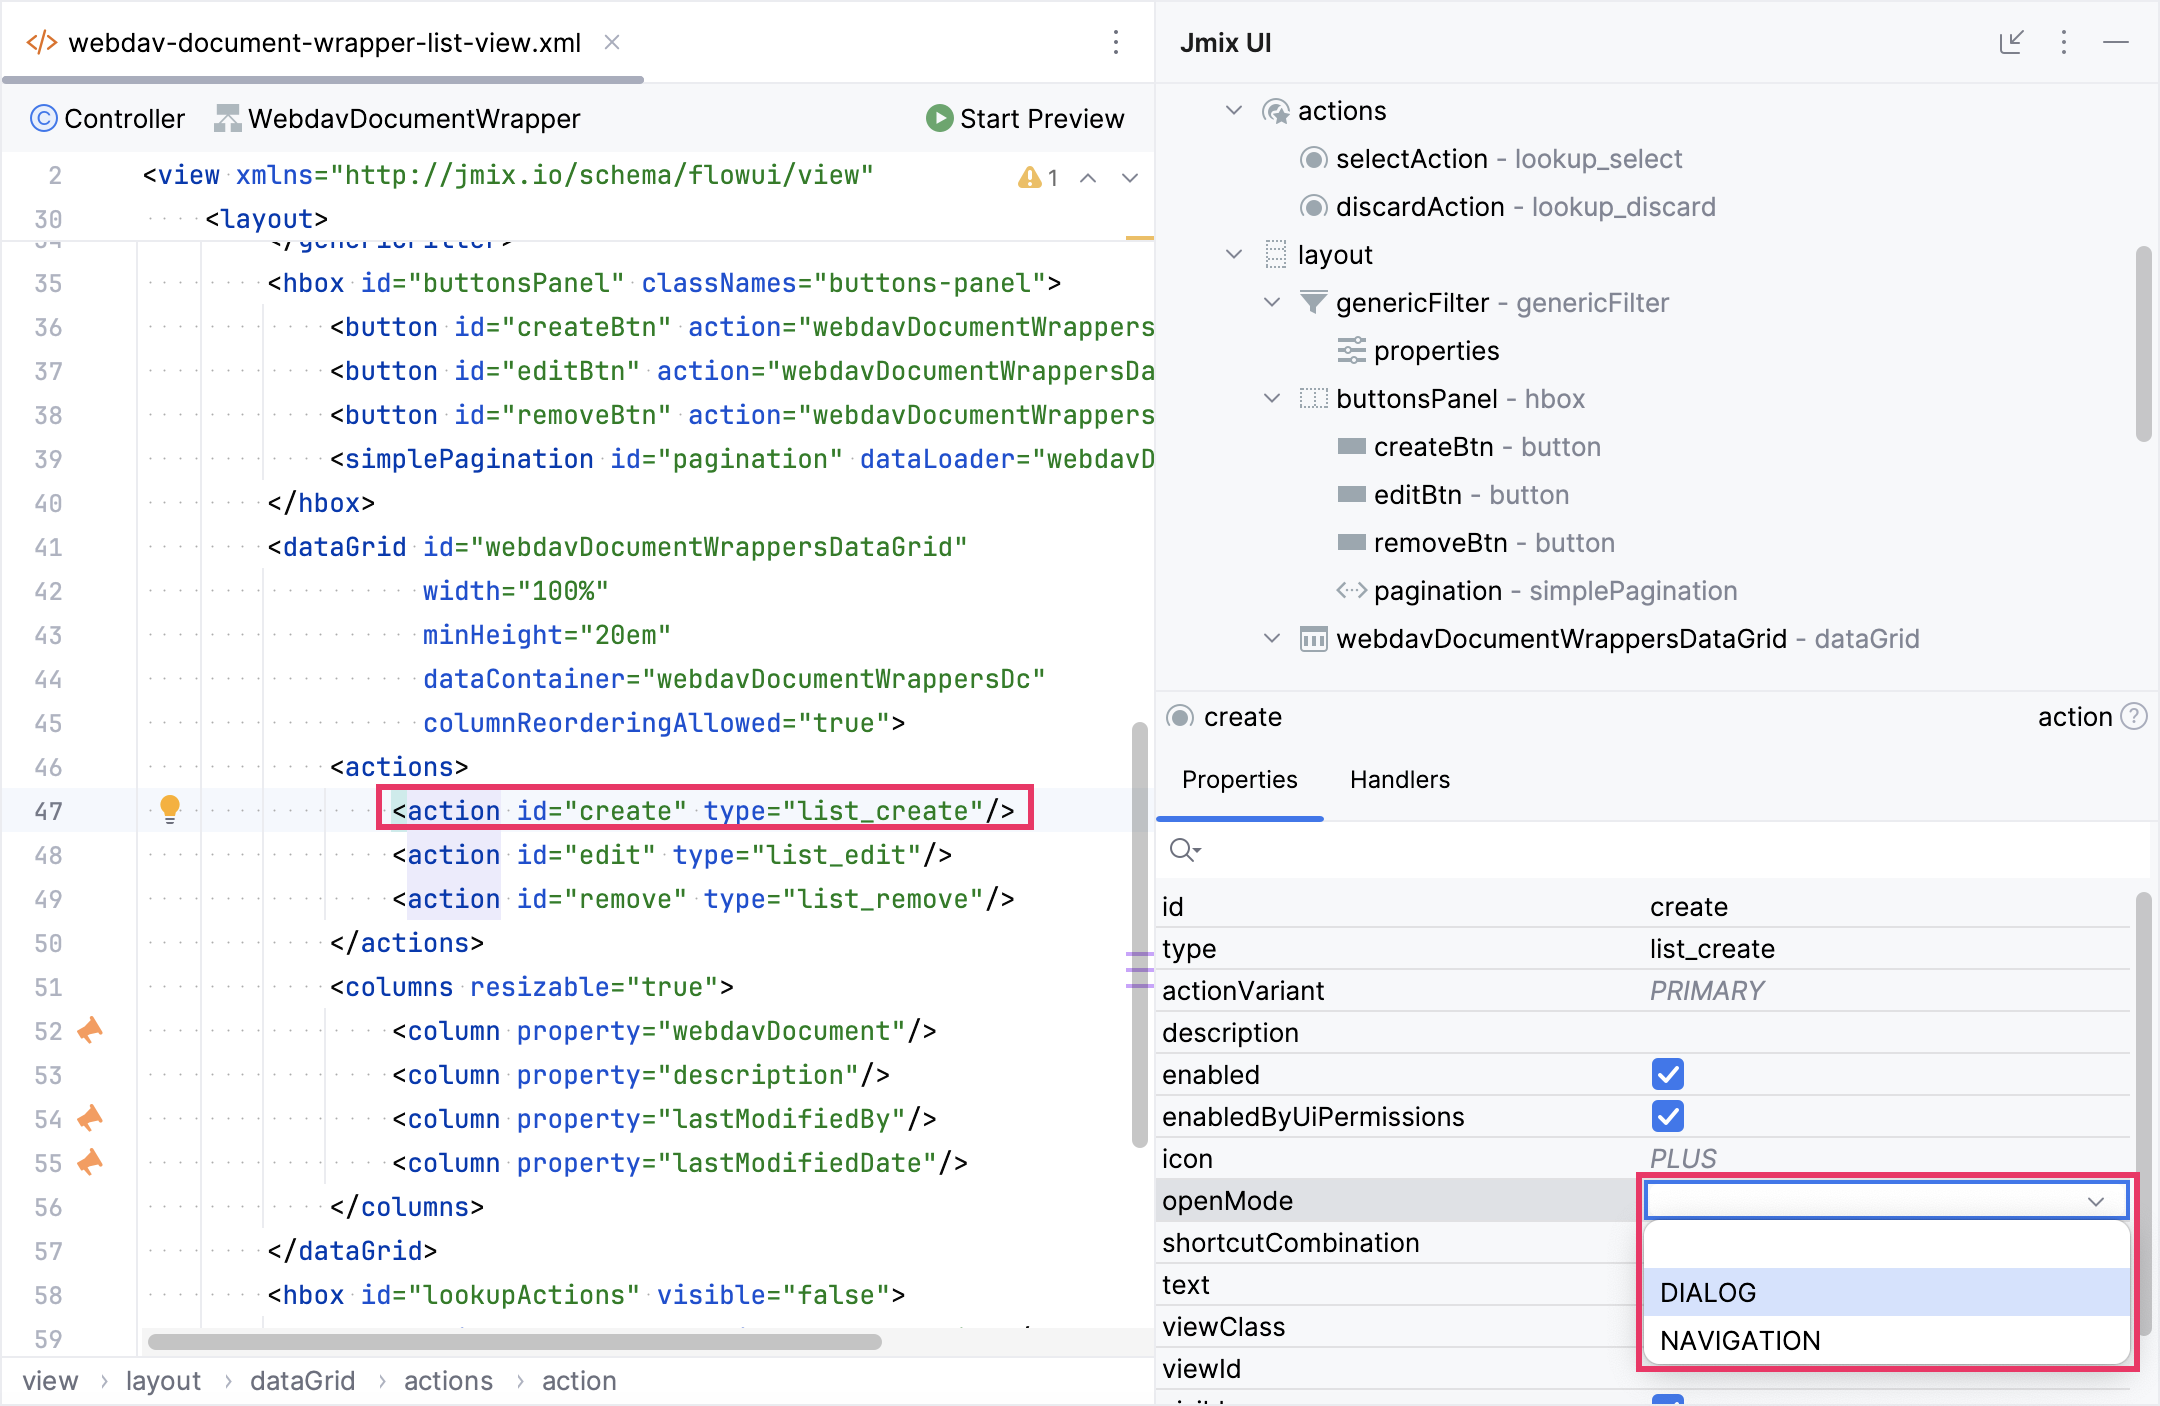
按同样的步骤配置 edit 操作。
应用程序启动并运行后,使用浏览器打开 http://localhost:8080 地址,然后使用 admin/admin 登录。
从 Application 菜单中选择 Webdav document wrappers 打开 WebdavDocumentWrapper.list 视图。
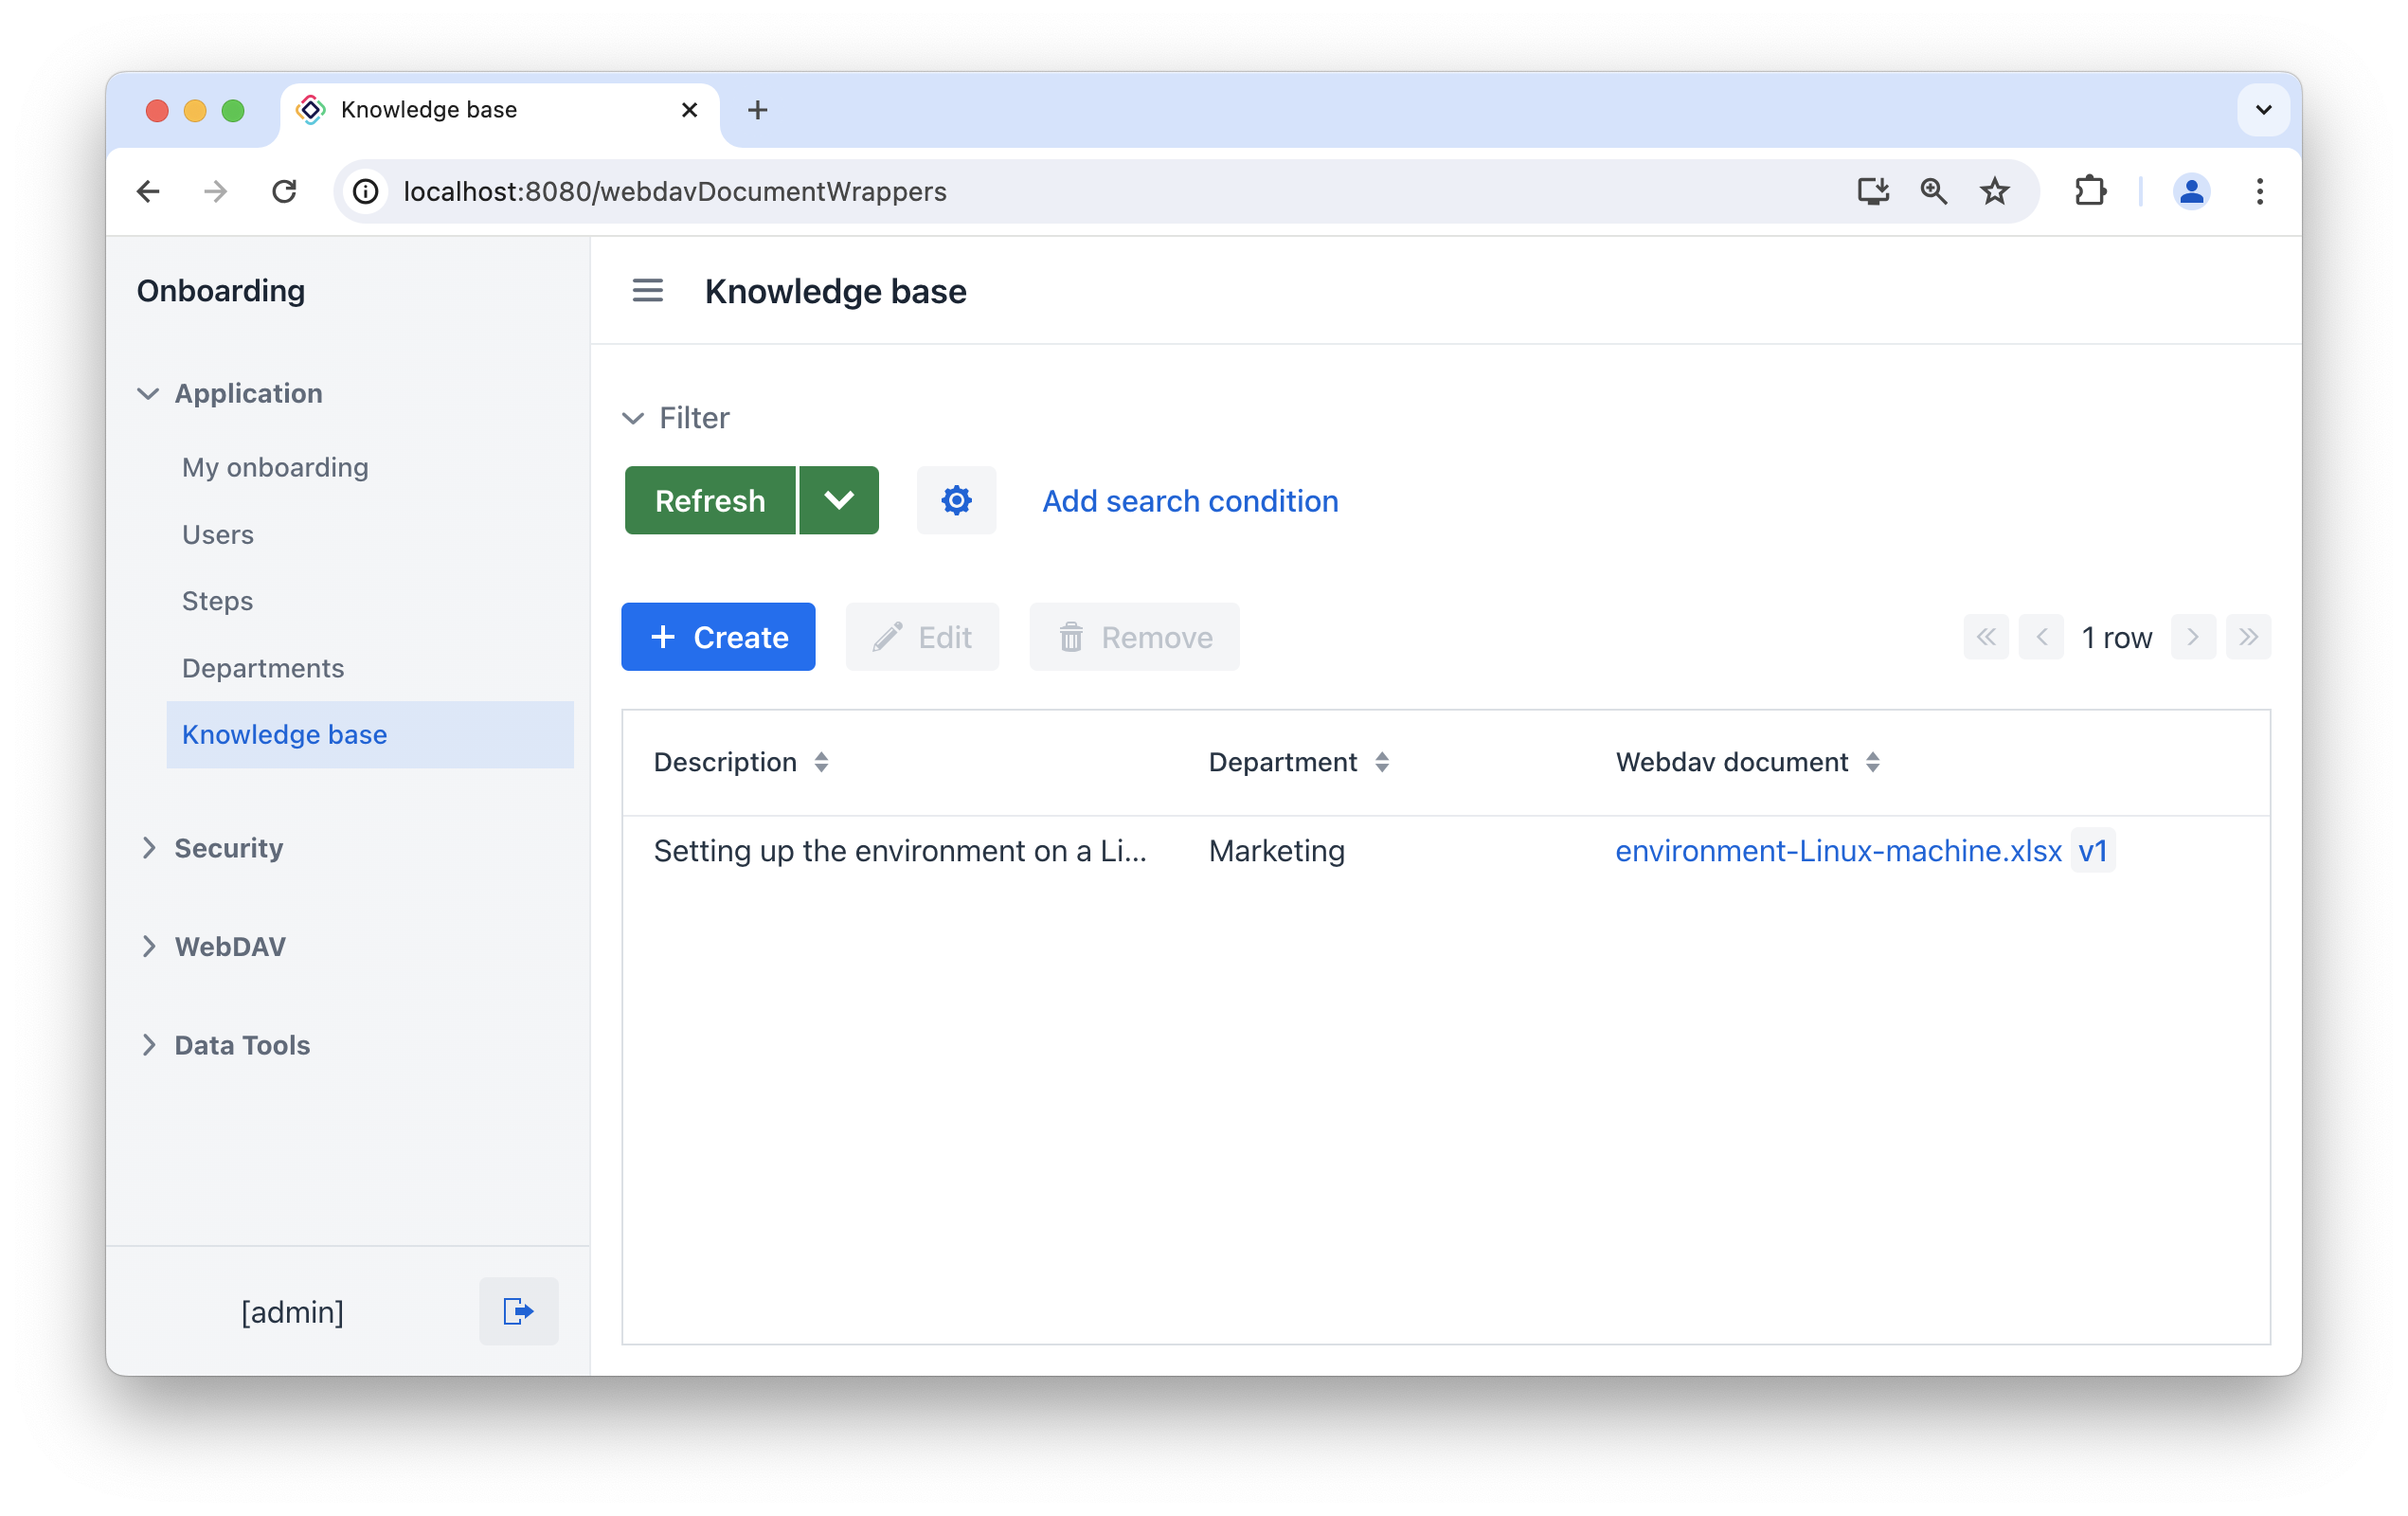
Webdav document 列现在显示 WebDAV 文档的链接,以及一个按钮,可以打开标准的 WebDAV 文档版本视图。Last modified by 列显示最后修改文档的人,以及 Last modified date 显示文档的最后更新时间。
配置
若要对桌面端应用程序进行认证,服务器必须使用 HTTPS。下面是在开发环境设置 HTTPS 的简要说明。
|
使用自签名的证书仅适合测试。生产环境的应用程序必须使用由信任机构颁发的 SSL 证书。 |
创建 Keystore 文件
-
使用 JDK 提供的 keytool 工具 生成 Keystore 文件:
keytool -genkey -keyalg RSA -alias localhost -keystore localhost.jks -validity 365 -keysize 2048会要求你设置 keystore 的密码和名称。记录输入的密码和名称。
-
从 keystore 导出证书:
keytool -export -keystore localhost.jks -storepass <password> -alias localhost -file localhost.cer使用第一步输入的密码替换
<password>。 -
在操作系统注册并信任证书。
-
Windows 操作系统:
-
按下
Win + R打开 Run 对话框,输入"certmgr.msc"并回车,打开 Certificate Manager。 -
在 Certificate Manager 左侧的面板中,展开 受信任的根证书颁发机构 文件夹。
-
右键点击文件夹并选择 所有任务 > 导入…,打开 证书导入向导。
-
在 证书导入向导 中,点击 下一步,然后选择证书文件点击 下一步。
-
选择导入至 受信任的根证书颁发机构 点击 下一步。
-
检查信息正确并点击 完成。
-
此时会显示一个导入成功的提示,关闭导入向导。
完成这些步骤后,证书会注册成功并收系统信任。
-
-
macOS:
-
在 Finder(访达)中双击
localhost.cer文件。会自动打开 Keychain Access(钥匙串访问) 应用程序。 -
在 Certficates(证书) 标签页找到第一步输入名称下的证书。
-
双击证书,并选择 Trust(信任) → When using this certificate: Always Trust(使用此证书时:始终信任)。
-
-
服务配置
本节介绍当从 IDE 运行应用程序或者用可执行 JAR 运行时,如何使用上一节生成的证书。
-
创建
src/main/resources/<base-package>/keystore目录,并将localhost.jks复制到该目录。 -
在
application.properties文件设置下列应用程序属性,用真实值替换<base-package>和<password>:# 启用 HTTPS server.ssl.enabled=true # keystore 的格式 server.ssl.key-store-type = JKS # 包含证书的 keystore 路径 server.ssl.key-store = classpath:<base-package>/keystore/localhost.jks # 生成 keystore 的密码 server.ssl.key-store-password = <password> # 证书的映射别名 server.ssl.key-alias = localhost # 服务端口 server.port = 8443keystore 路径的
<base-package>部分(server.ssl.key-store配置中)应该是由斜杠分隔的路径:server.ssl.key-store = classpath:com/example/demo/keystore/localhost.jks
-
打开主应用程序类,并修改
printApplicationUrl()方法。由于配置了 HTTPS,URL 需要修改为https://:@EventListener public void printApplicationUrl(final ApplicationStartedEvent event) { LoggerFactory.getLogger(DemoApplication.class).info("Application started at " + "https://localhost:" + environment.getProperty("local.server.port") + Strings.nullToEmpty(environment.getProperty("server.servlet.context-path"))); }
按照上面的步骤完成后,启动应用程序即可在桌面 office 应用中打开上传的文档。
小结
在本节中,我们完成了一些最简单的功能:WebDAV 文档管理。
主要内容:
-
WebDAVDocumentUploadField 组件包含了内置的工具,可以用于方便地查看和上传 WebDAV 文档。
-
若要启用使用桌面 office 应用程序打开和编辑 WebDAV 文档,必须为 Web 应用程序配置 HTTPS。
