为 Google 和 Microsoft 设置 OAuth
Jmix 应用程序可以使用基于 OAuth 2.0 token 的授权与邮件服务提供商通信。与使用登录名和密码的基本身份验证相比,此方法提供了更高的安全性。许多提供商正在逐步弃用对基本身份验证的支持,使得 OAuth 成为唯一可行的身份验证类型。
本节介绍从 Google 和 Microsoft 获取 OAuth 凭证的过程,以及 Jmix 应用程序的配置步骤。
如需启用 Google OAuth,请注册 OAuth 应用程序并生成凭证。然后,使用获得的凭证设置 Jmix 应用程序。
| 以下说明基于 Google 开发者文档中关于 为 Web 应用程序设置 OAuth 的内容。请查看链接中的原文以获取最新的步骤和用例详情。 |
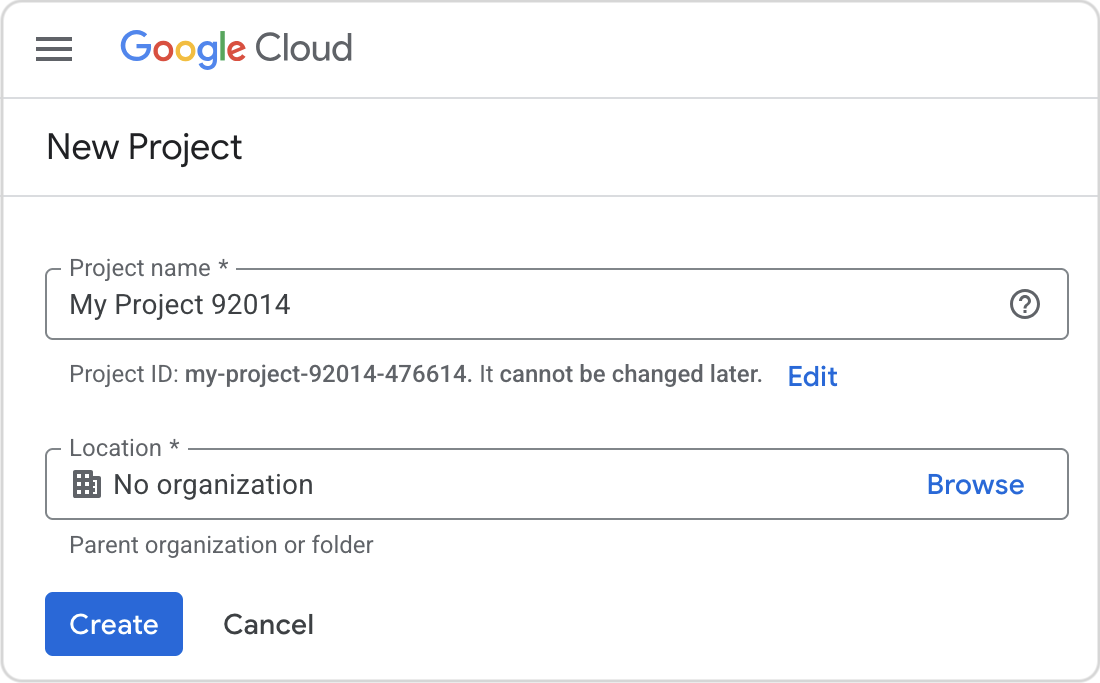
创建项目
-
登录 Google Cloud 控制台.
-
在顶部工具栏点击 Select a project。
-
点击 New project 并输入项目信息。
-
点击 Create.
创建一个 OAuth 2.0 应用程序
-
选择之前创建的项目。
-
点击左上角的菜单按钮,并选择 APIs & Services → OAuth consent screen。
-
点击 Get Started.
-
填写表单:

-
点击 Create
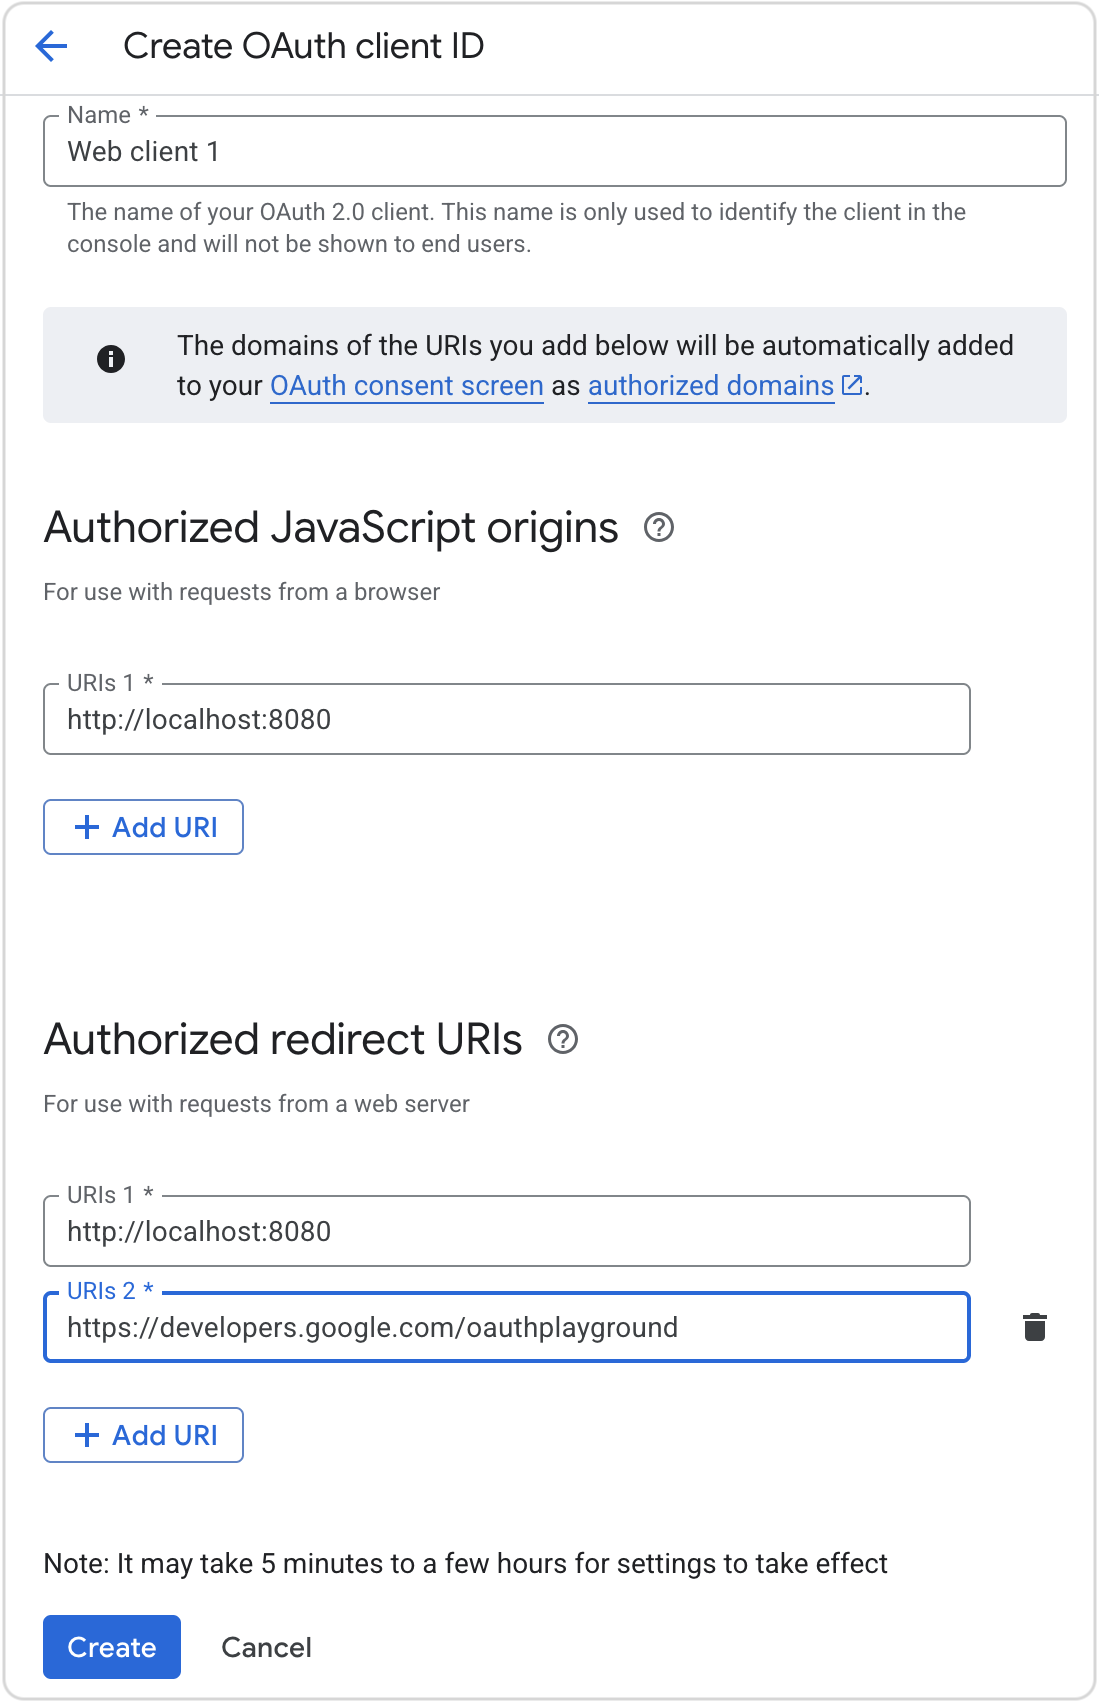
创建授权凭证
应用程序必须具有授权凭证才能访问 API:
-
前往 客户端配置页。
-
如果出现提示,请选择你的项目。
-
点击 Create client。
-
选择 Web application 应用类型。
-
填写表单:
-
Name:(提供任意描述性名称。)
-
Authorized JavaScript origins:http://localhost:8080(使用 Jmix 应用程序地址。这些 origins 用于标识你的应用程序可以向 OAuth 2.0 服务器发送请求的域。)
-
Authorized redirect URIs:
-
http://localhost:8080(使用 Jmix 应用程序地址。)
-
https://developers.google.com/oauthplayground (此 URI 用于访问 Google Developers OAuth2 playground,从而在下一步中获取 token。)
-
-
-
点击 Create.
-
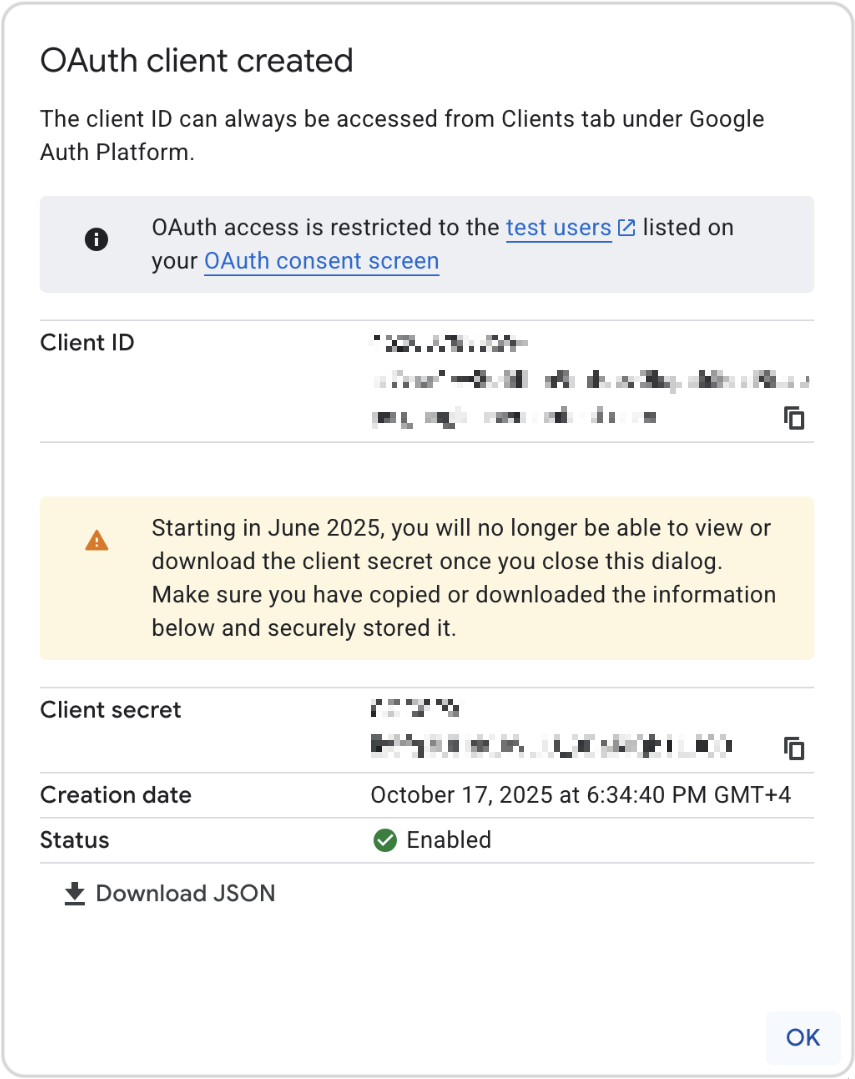
复制或下载 Client ID 和 Client secret,保存至安全处,后续步骤会用到。
获取刷新 Token
Token 将使用 Google Developers OAuth2 playground 通过授权码流程获取。
| 可以使用其他方法来完成授权码流程,例如使用 Postman、 oauthdebugger 或手动请求。 |
-
打开 OAuth 2.0 配置(齿轮图标)。
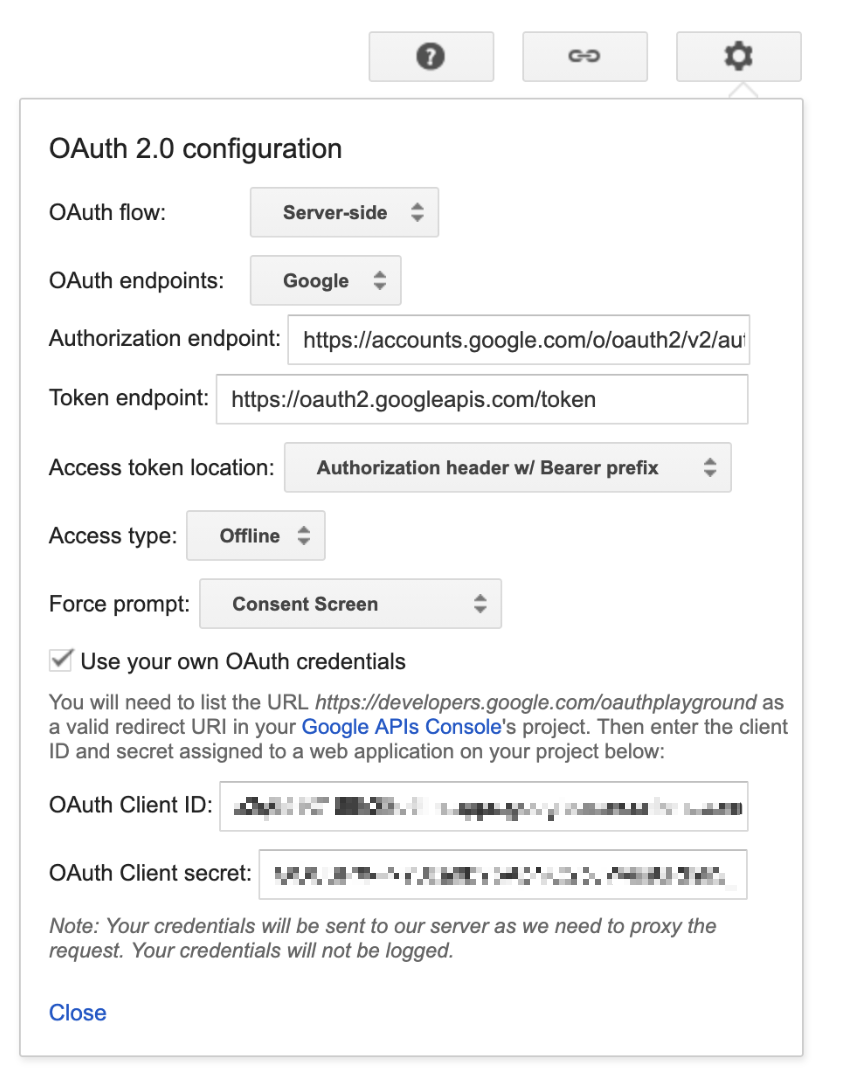
-
选中 Use your own OAuth credentials 复选框。
-
输入你的 Client ID 和 Client Secret。
-
-
在左侧的范围列表中,选择 Gmail API → https://mail.google.com/
-
点击 Authorize APIs。
-
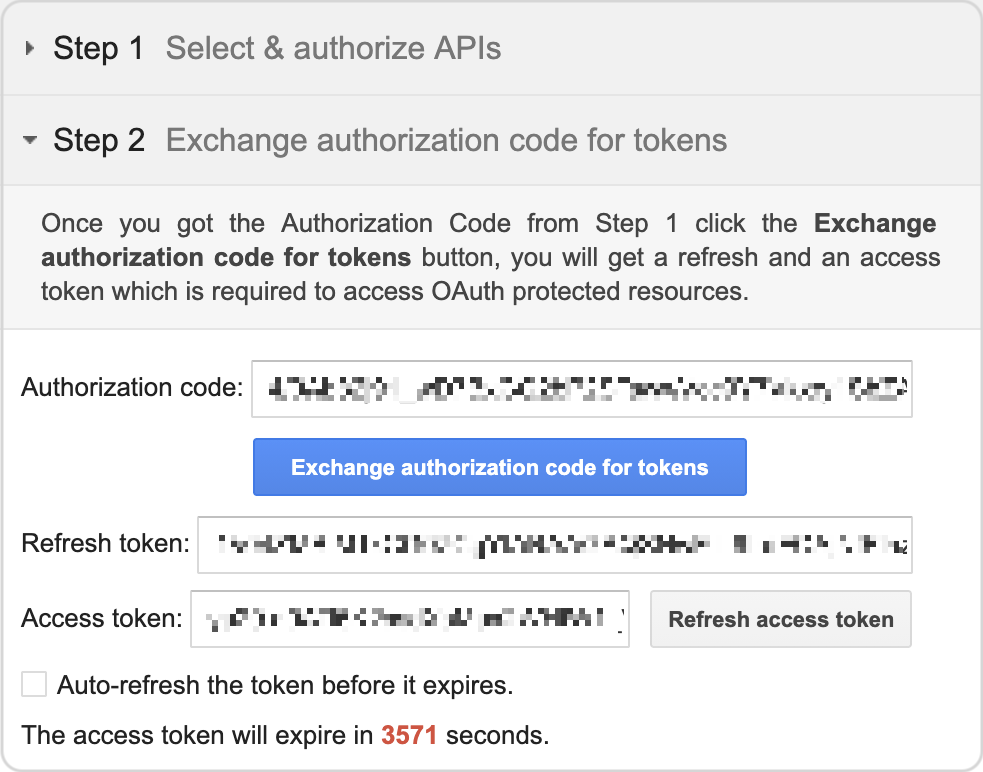
现在有了 Authorization code。点击 Exchange authorization code for tokens。
-
复制 Refresh token。
配置应用程序属性
使用获取的凭证配置 Jmix 应用程序的 application.properties 文件:
spring.mail.host=smtp.gmail.com
spring.mail.port=587
spring.mail.protocol=smtp
spring.mail.username=<account_name>
spring.mail.properties.mail.smtp.auth=true
spring.mail.properties.mail.smtp.starttls.enable=true
spring.mail.properties.mail.smtp.ssl.trust=smtp.gmail.com
spring.mail.properties.mail.smtp.auth.mechanisms=XOAUTH2
spring.mail.properties.mail.smtp.sasl.enable=true
spring.mail.properties.mail.smtp.sasl.mechanisms=XOAUTH2
spring.mail.properties.mail.smtp.auth.login.disable=true
spring.mail.properties.mail.smtp.auth.xoauth2.disable=false

jmix.email.oauth2.enabled=true
jmix.email.oauth2.provider=google
jmix.email.oauth2.client-id=<client_id>
jmix.email.oauth2.secret=<client_secret>
jmix.email.oauth2.refresh-token=<refresh_token>
这里 <account_name> 是用来配置的 email 地址。<client_id>、<client_secret>、<refresh_token> 是上面从 Google 获取到的信息。
| 另外,在运行时,可以通过 OAuth2 token 视图提供或修改刷新 token 的值。 |
Microsoft
如需启用 Microsoft OAuth,请注册 OAuth 应用程序并生成凭证。然后,使用获得的凭证设置 Jmix 应用程序。
| 以下说明基于 Microsoft Entra 文档 的内容。请查看链接中的原文以获取最新的步骤和用例详情。 |
注册应用
-
如果你有多个 Azure Active Directory 租户,请切换到所需的租户。
-
导航到 App registrations。
-
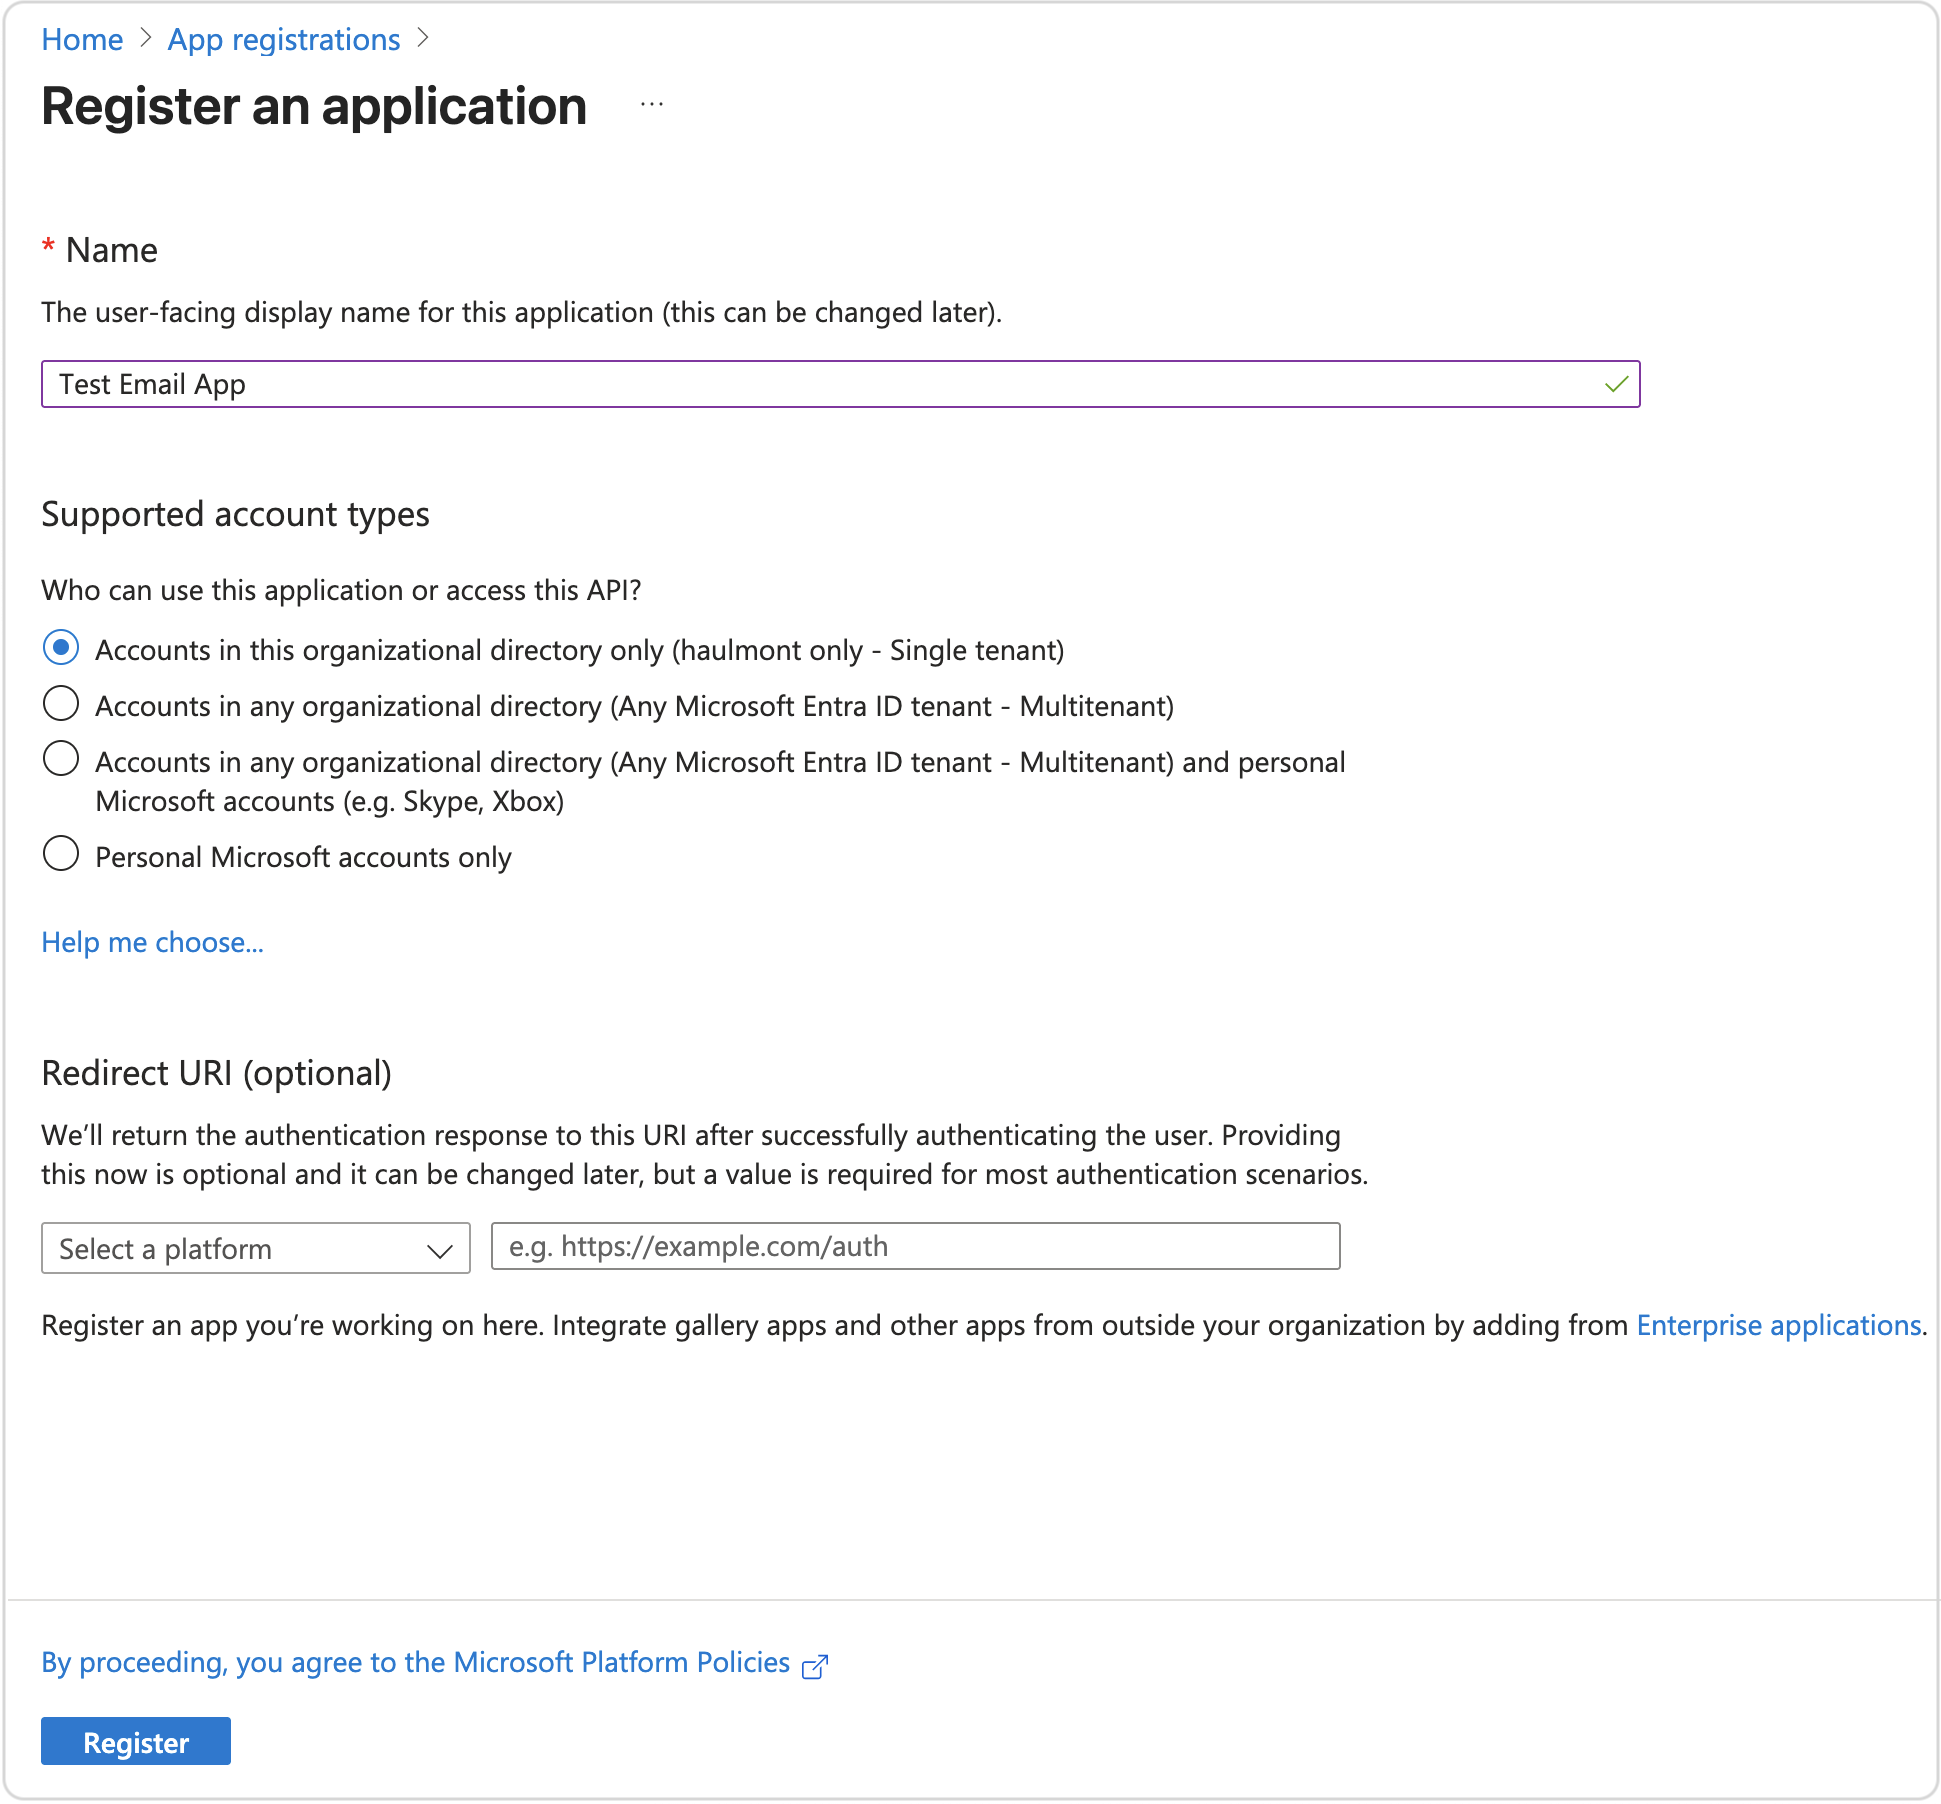
点击 New Registration 并提供以下信息:
-
应用的名称。
-
在 Supported account types 下,选择适用于你业务场景的选项。
-
在 Redirect URI 下,从 Select a platform 下拉列表中选择 Web,并将 http://localhost:8080(Jmix 应用地址)设置为重定向 URI。
-
-
点击 Register。
你的应用现在位于 Home → App Registrations 下。在应用中,你可以查看 Application (client) ID 和 Directory (tenant) ID 的值。
生成客户端秘钥
-
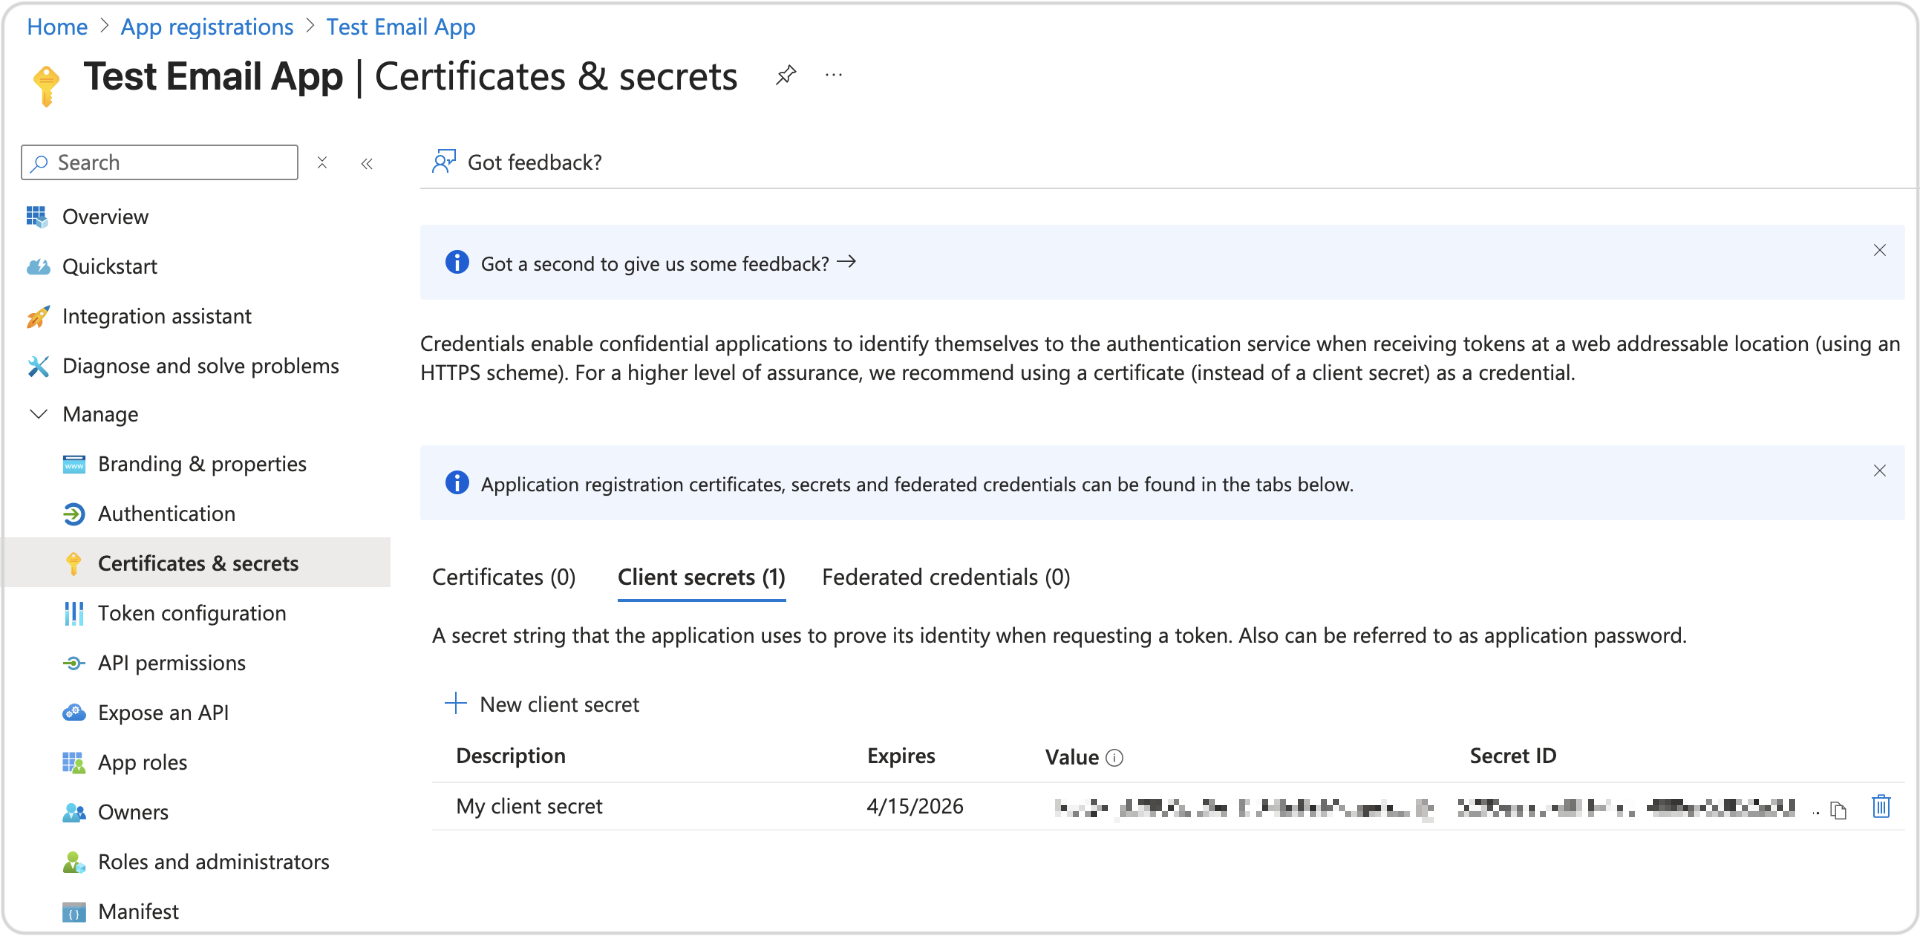
打开你的应用并导航到 Certificates & Secrets。
-
点击 New Client Secret。
-
输入描述和有效期。
-
点击 Add,然后复制密钥 Value。这就是 OAuth 2.0 客户端密钥。
获取刷新 Token
Token 必须使用浏览器或 CLI 通过授权码流程获取。
| 可以使用其他方法来完成授权码流程,例如使用 Postman、 oauthdebugger 或手动请求。下面的示例使用浏览器和 CLI。 |
-
导航至以下 URL:
// 这里换行只是为了显示清晰的结构

https://login.microsoftonline.com/<tenant_id>/oauth2/v2.0/authorize?
client_id=<client_id>
&response_type=code
&redirect_uri=http://localhost:8080
&response_mode=query
&scope=offline_access%20https://outlook.office.com/SMTP.Send
这可能需要管理员同意才能访问所请求的 API 权限。一旦用户通过身份验证并授予同意,Microsoft 身份平台将返回一个响应。以下示例显示了一个成功的响应内容:
http://localhost:8080/?
code=AwABAAAAvPM1KaPlrEqdFSBzjqfTGBCmLdgfSTLEMPGYuNHSUYBrq...
&session_state=12345
-
保存响应中的
code参数值。 -
交换获取 token:
 curl -X POST https://login.microsoftonline.com/<tenant_id>/oauth2/v2.0/token \
-H "Content-Type: application/x-www-form-urlencoded" \
-d "grant_type=authorization_code" \
-d "client_id=<client_id>" \
-d "client_secret=<client_secret>" \
-d "code=<code_value>" \
-d "redirect_uri=http://localhost:8080" \
-d "scope=offline_access https://outlook.office.com/SMTP.Send email openid"
-
成功的响应会包含一个
refresh_token值。复制保存以便后续使用。
配置应用程序属性
使用获取的凭证配置 Jmix 应用程序的 application.properties 文件:
spring.mail.host=smtp.office365.com
spring.mail.port=587
spring.mail.protocol=smtp
spring.mail.username=<account_name>
spring.mail.properties.mail.smtp.auth=true
spring.mail.properties.mail.smtp.starttls.enable=true
spring.mail.properties.mail.smtp.ssl.trust=smtp.office365.com
spring.mail.properties.mail.smtp.auth.mechanisms=XOAUTH2
spring.mail.properties.mail.smtp.sasl.enable=true
spring.mail.properties.mail.smtp.sasl.mechanisms=XOAUTH2
spring.mail.properties.mail.smtp.auth.login.disable=true
spring.mail.properties.mail.smtp.auth.xoauth2.disable=false

jmix.email.oauth2.enabled=true
jmix.email.oauth2.provider=microsoft
jmix.email.oauth2.client-id=<client_id>
jmix.email.oauth2.secret=<client_secret>
jmix.email.oauth2.tenant-id=<tenant_id>
jmix.email.oauth2.refresh-token=<refresh_token>
这里 <account_name> 是用来配置的 email 地址。<client_id>、<client_secret>、<refresh_token>、<tenant_id> 是上面从 Microsoft 获取到的信息。
| 另外,在运行时,可以通过 OAuth2 token 视图提供或修改刷新 token 的值。 |
